Metallographic Polishing Cloths and Metkon Solutions
Metallographic Polishing Cloths and Metkon Solutions
As up to 80% of mistakes can be traced back to bad sample preparation, when preparing metals for analysis the quality of the polishing cloth is basically what makes or breaks the whole process. Here at Metkon, we’ve made it our mission to master the art of metallographic polishing and now offer polishing cloths that deliver results that are nothing short of flawless.
Coming hotfooting into the metallographic process, we know that precision cutting, mounting, grinding and polishing are the way to go and in that sequence different types of cloths can turn rough surfaces into silky smooth micro-level finishes. We’re saying that your last polishing cloth should be able to knock out roughly three times the depth of any problems that were there before, which, in the case of high-quality fine metals, is a critical requirement, since tiny imperfections can send the whole analysis off the rails.
Our step-by-step guide will walk you through the various grades of our polishing cloths, starting with rough work using silicon carbide abrasives that range from 60 to 1200 grit and leading all the way to the super-smooth specimens that are ready for the microscope.
Understanding Metkon’s Polishing Cloth Range
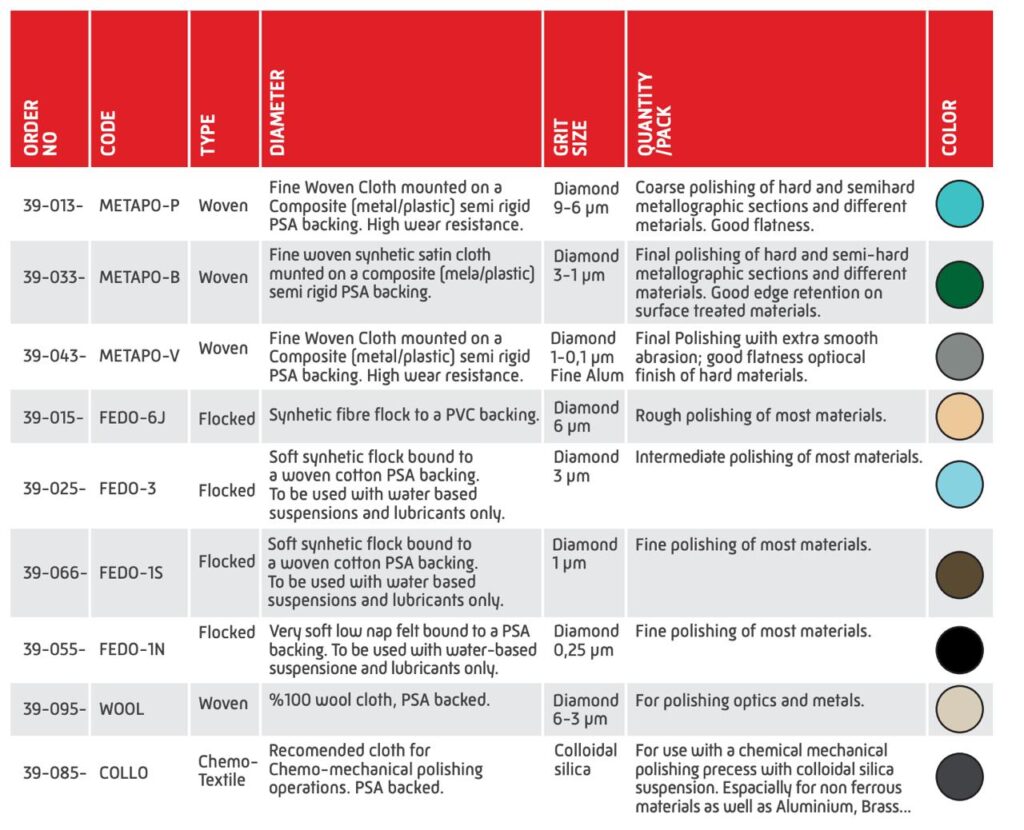
The right polishing cloth plays a key role in getting deformation-free surfaces during metallographic preparation. Metkon makes polishing cloths of all types, each designed to work best at specific preparation stages with different materials.
Woven vs Non-Woven vs Flocked Cloths
The structure of a polishing cloth decides how well the polishing cloth works. I have found that woven cloths have woven fibers. Those fibers make the polishing cloth last longer and let the polishing cloth spread abrasives evenly. The polishing cloth keeps specimens flat at the edges. The polishing cloth works well for the middle stage polishing.
Metallography Consumables: Expert Tips for Better Surface Finish Results
Non-woven cloths work in a way. Non-woven cloths use the fibres that are arranged randomly to make more pores. This lets Non-woven cloths hold the lubricants and the abrasives better. This makes Non-woven cloths a good choice when you need the flexibility.
Flocked cloths stand out with their design. Short fibres stick straight up from the backing material. You get precise control during final polishing, which helps create mirror-like finishes on tough specimens.
Cloth Compatibility with Material Hardness
The structure of a polishing cloth decides how well the polishing cloth works. I have found that woven cloths have woven fibers. Those fibers make the polishing cloth last longer and let the polishing cloth spread abrasives evenly. The polishing cloth keeps specimens flat at the edges. The polishing cloth works well for the middle stage polishing.
Non-woven cloths work in a way. Non-woven cloths use the fibres that are arranged randomly to make more pores. This lets Non-woven cloths hold the lubricants and the abrasives better. This makes Non-woven cloths a good choice when you need the flexibility.
Flocked cloths stand out with their design. Short fibres stick straight up from the backing material. You get precise control during final polishing, which helps create mirror-like finishes on tough specimens.
Petrography Explained: Essential Methods in Modern Petrology Science
Polishing Cloths for Fine Metals and Alloys
Fine metals and sensitive alloys require special attention. Metkon’s microfibre polishing cloths gently contact the surface without cutting too deeply. This makes them ideal for precious metals and delicate alloys.
When working with multi-phase alloys that have both hard and soft components, moderately flexible cloths such as METAPO-P are ideal. They polish all areas consistently, revealing the underlying links between distinct phases while avoiding uneven surfaces.
Your final fabric choice is determined by two factors: the mechanical qualities of your specimen and the information you hope to gain from it.
Step-by-Step Polishing Workflow Using Metkon Cloths
A well-laid-out approach to metallographic polishing will give reproducible, high-quality results with minimal preparation artefacts. You can get specimens that truly represent the material’s microstructure by using Metkon cloths in a structured way.
Initial Grinding with SiC Papers and METAPO-P
Planar grinding with silicon carbide papers is the first step on the road to successful preparation. You should choose the best grit that will get rid of sectioning damage. For specimens cut with abrasive wheels, this is usually P180-P240. To get rid of scratches that go in a certain direction, move through finer grits (P400, P600, P800, P1200) and turn the specimen 90° between steps. Moderate pressure (25–30N) and a disc speed of 250–300 RPM give the best results. The hard surface of METAPO-P cloth helps with flat pre-polishing and stops edges from getting worse.
Intermediate Polishing with 6µm and 3µm Diamond on METAPO-B
After the grinding step, switch to the METAPO-B cloth, which is made of a fine woven synthetic satin material with a semi-rigid backing. For 4 to 6 minutes at 150 RPM with 20N pressure, use 6μm diamond suspension. For 3 to 5 minutes at 15N pressure, use 3μm diamond. Don’t let the cloth get too wet; just keep it damp. Too much lubricant makes a barrier that slows down the removal of material. When the specimen holder and cloth rotate in opposite directions, contra-rotation works better for harder specimens.
Final Polishing with 0.05µm Colloidal Silica on COLLO Cloth
To get a mirror-like finish, you need COLLO cloth with 0.05μm colloidal silica that combines mechanical polishing and light chemical etching. At this point, you should lower both the pressure (10–15N) and the speed (120–150 RPM). This method works well for metals that don’t contain iron, like brass and aluminum. To keep sensitive materials from oxidizing, EBSD analysis needs longer polishing times with water-free colloidal silica.
Polishing Microfiber Cloths for Soft Alloys
Microfiber polishing cloths work best on soft alloys because they stop deformation and relief formation. These cloths evenly distribute pressure across samples with varying levels of hardness. To keep relief from happening, soft materials need less time to polish. Alcohol-based or special oil-based lubricants keep magnesium and aluminum parts from washing away during preparation.
Edge Retention Techniques Using Hard Cloths
During the early stages, hard polishing cloths with low resilience help keep edges sharp. Edge preservation requires 15 to 20 percent less pressure and RPM. To support mounted samples, they need 3 to 5 mm of mounting material beyond the edge of the specimen. When the sample and platen rotate in the same direction, complementary rotation makes it easier to keep the edge during final polishing.
Parameter Control for Flawless Surface Finish
The difference between average and great specimens is how well you control the parameters. My tests with all kinds of materials show that adjusting operational variables can help get surfaces that are free of scratches.
Recommended RPM and Load for Each Stage
The speed of rotation and the amount of pressure applied affect the rate of material removal. For harder materials (more than 45 HRC), the speed should be 300 to 350 RPM and the pressure should be 30 to 35N. For materials with a medium hardness (35–45 HRC), 250–300 RPM and 25–30N are best. For soft materials, the settings should be 200 to 250 RPM and 20 to 25N of pressure. For medium-hard specimens, diamond abrasive intermediate polishing needs lower settings: 150–180 RPM and 20–25N. For soft materials, final polishing needs even lower speeds: 100-120 RPM and 10-12N.
Lubricant Flow Rate and Its Effect on Surface Quality
Good lubrication keeps the temperature of the specimen steady, moves abrasives, and gets rid of debris. When grinding, water-based lubricants need 4 to 6 drops per minute, and when polishing in between, they need 2 to 3 drops. Oil-based lubricants work best with a slower flow, usually 1–2 drops per minute, because they hold diamond particles better. When lubrication is bad, heat builds up and abrasive clumps form, which can cause deep scratches.
Time Duration Guidelines to Avoid Over-Polishing
Visual cues are better than set times. It takes 45 to 60 seconds to plane grind each paper grade. Most engineering alloys need diamond suspensions for 3 to 5 minutes for intermediate polishing. The last polish should only take 1 to 3 minutes. Signs that you are over-polishing include edges that are too rounded, relief between structures, and comet tails that are getting longer.
Complementary vs Contra-Rotation in Final Polishing
During complementary rotation, the specimen holder and platen turn in the same direction. During contra-rotation, they turn in opposite directions. Contra-rotation is more aggressive at removing material, but it can also make comet tails around hard particles. Edge preservation needs 15–20% less pressure and complementary rotation in the last stages. You can fix relief patterns around inclusions after final polishing by doing the process again with complementary rotation.
Troubleshooting Common Polishing Issues
Even the best preparation methods can run into problems. In my experience, understanding common polishing problems is important for getting consistent metallographic results.
Preventing Pull-Outs in Composite Materials
Particles or phases come loose during polishing, which causes pull-outs. These make false pits that look like porosity. You can make this problem less bad by using low-viscosity epoxy to fill in samples before putting together composite materials. To stop hard particles from pulling out of softer matrices, you should lower the polishing pressure by 15–20% from what is usually recommended. The hardness of your mounting media should be the same as the hardness of your specimen. Napless polishing cloths work best because they don’t “pluck” particles out of the matrix.
Avoiding Scratches After Final Polish
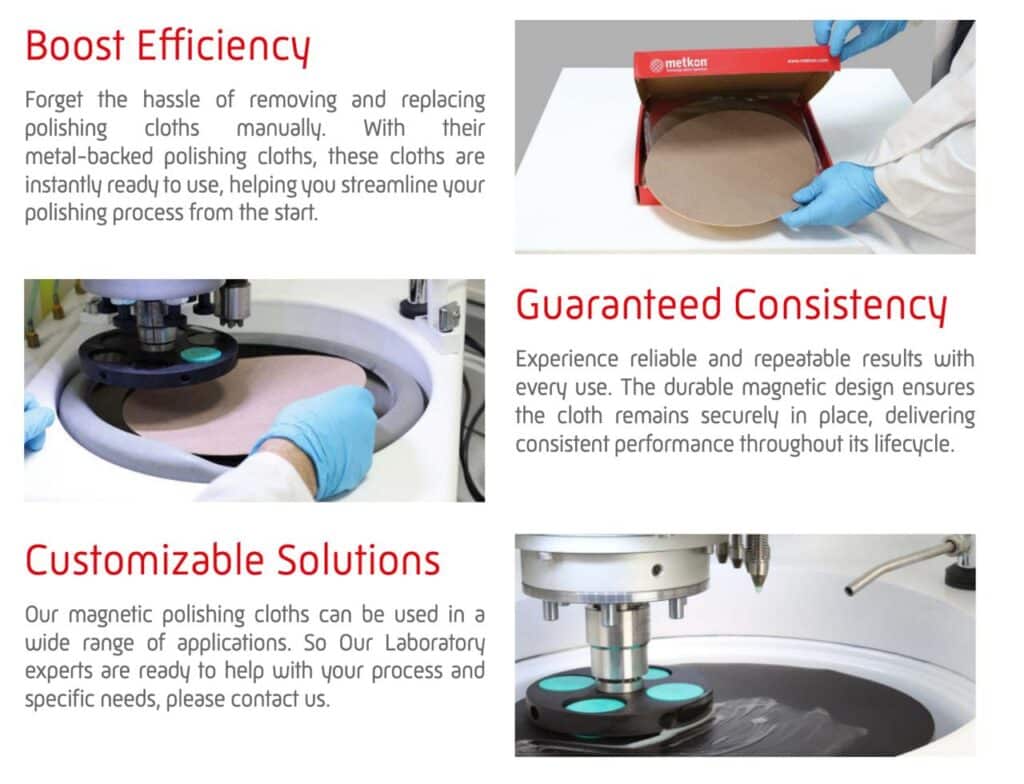
Cross-contamination between steps in the preparation process can cause scratches that won’t go away even after polishing. Cleaning specimens with ultrasound between grinding stages will get rid of this. It’s also helpful to use different polishing cloths for each size of abrasive. A close-up look at samples after each step shows that what look like scratches could actually be twins or slip bands in some materials. A clean pad makes polishing much more efficient because it is always ready to work at its best.
Minimising Relief and Smearing in Soft Metals
Soft phases wear down faster than hard ones, which makes non-planar surfaces feel better. Using polishing cloths that are less durable and take less time to polish can help with this problem. Before final polishing, cooling samples to 10–15°C greatly lowers plastic deformation in soft metals like aluminum. Another option is attack polishing, which involves mixing 5–10% hydrogen peroxide with colloidal silica to break up smeared layers.
Cleaning Protocols Between Polishing Stages
If you don’t clean between steps, cross-contamination can ruin your work. Start by rinsing the samples with warm water and gently wiping them with cotton. After that, spray them with laboratory-grade ethanol and let them dry with filtered compressed air. Before going on to finer polishing steps, ultrasonic cleaning in the right solvents is very important for porous or multi-phase samples. To keep the environment clean, you should keep your polishing cloths in closed containers.
Metallographic Mounting Machine | Optimizing Specimen Preparation
This article goes over everything you need to know about metallographic preparation with Metkon’s high-tech polishing cloths. To make perfect specimens, you need to use high-quality materials and follow exact steps. Choosing between woven, non-woven, and flocked cloths is very important for your final results, especially if your specimen material is hard.
Every time, the right workflow makes sure that the results are the same and of high quality. The first step is to grind with METAPO-P and silicon carbide papers. Next, you use diamond suspensions on METAPO-B to polish the surface. The last step is to use colloidal silica on COLLO cloth to make the finish look like a mirror. This methodical way of doing things helps you avoid making mistakes that are common.
Controlling parameters is very important for preparing metallographic samples. The quality of the surface is directly affected by the RPM, load, flow of lubricant, and length of time spent polishing. You can improve your technique for dealing with certain types of materials by choosing between complementary and contra-rotation methods.
Using the right Metkon cloths and the best polishing settings can help with problems like pull-outs, scratches that won’t go away, relief formation, and smearing. Cleaning your tools between steps stops cross-contamination that could mess up your results.
Years of doing metallographic preparation have taught me that it combines science and art. With this information, you can choose the best polishing cloths for your materials and uses. To get good results from your microstructural analysis, you need to prepare your specimens well. Metkon’s full line of polishing cloths helps you get great results every time, no matter what kind of material or analysis you need.
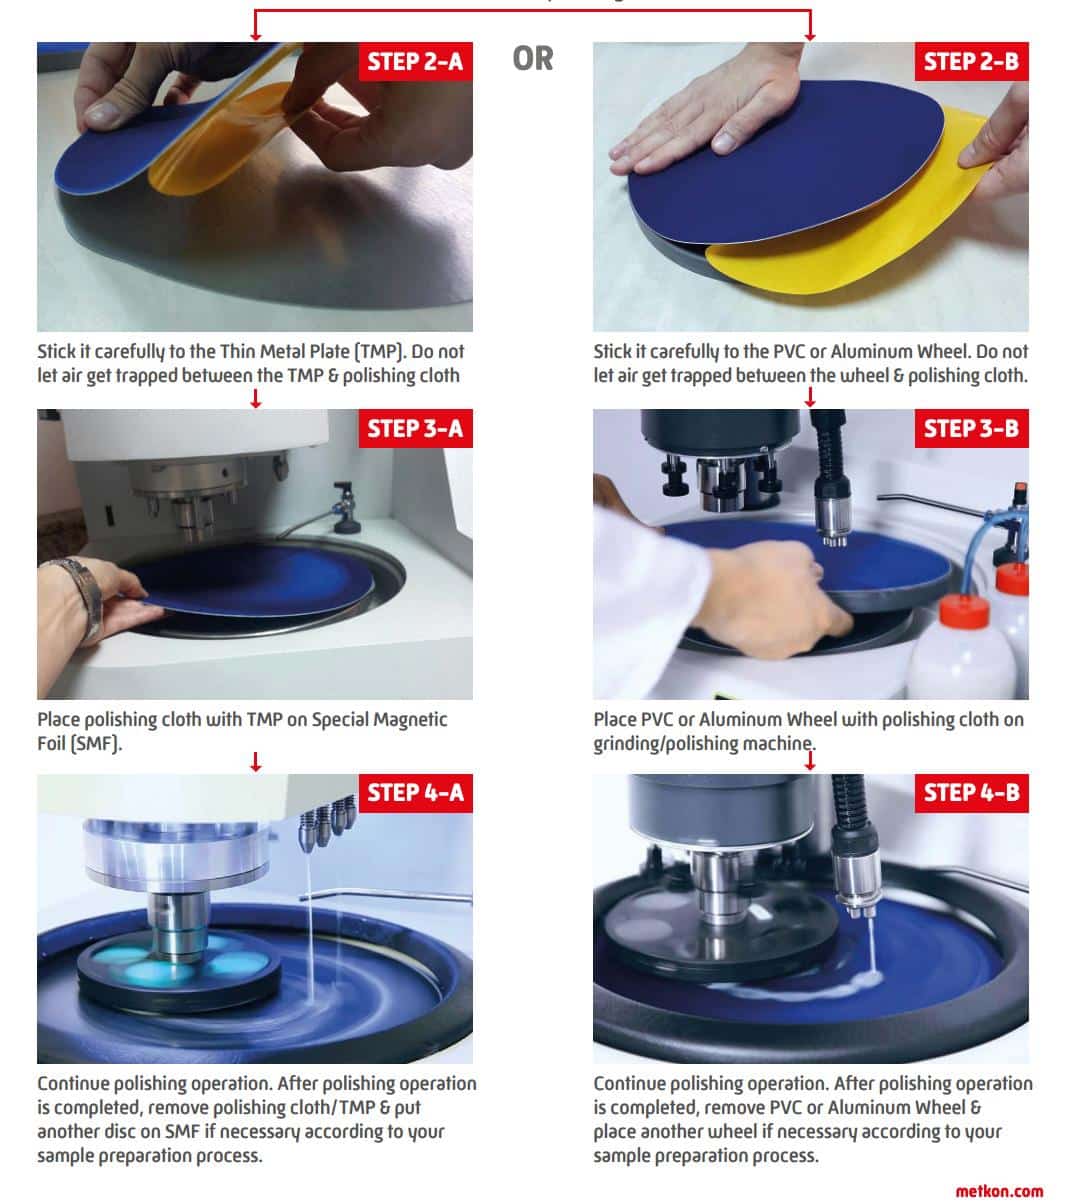
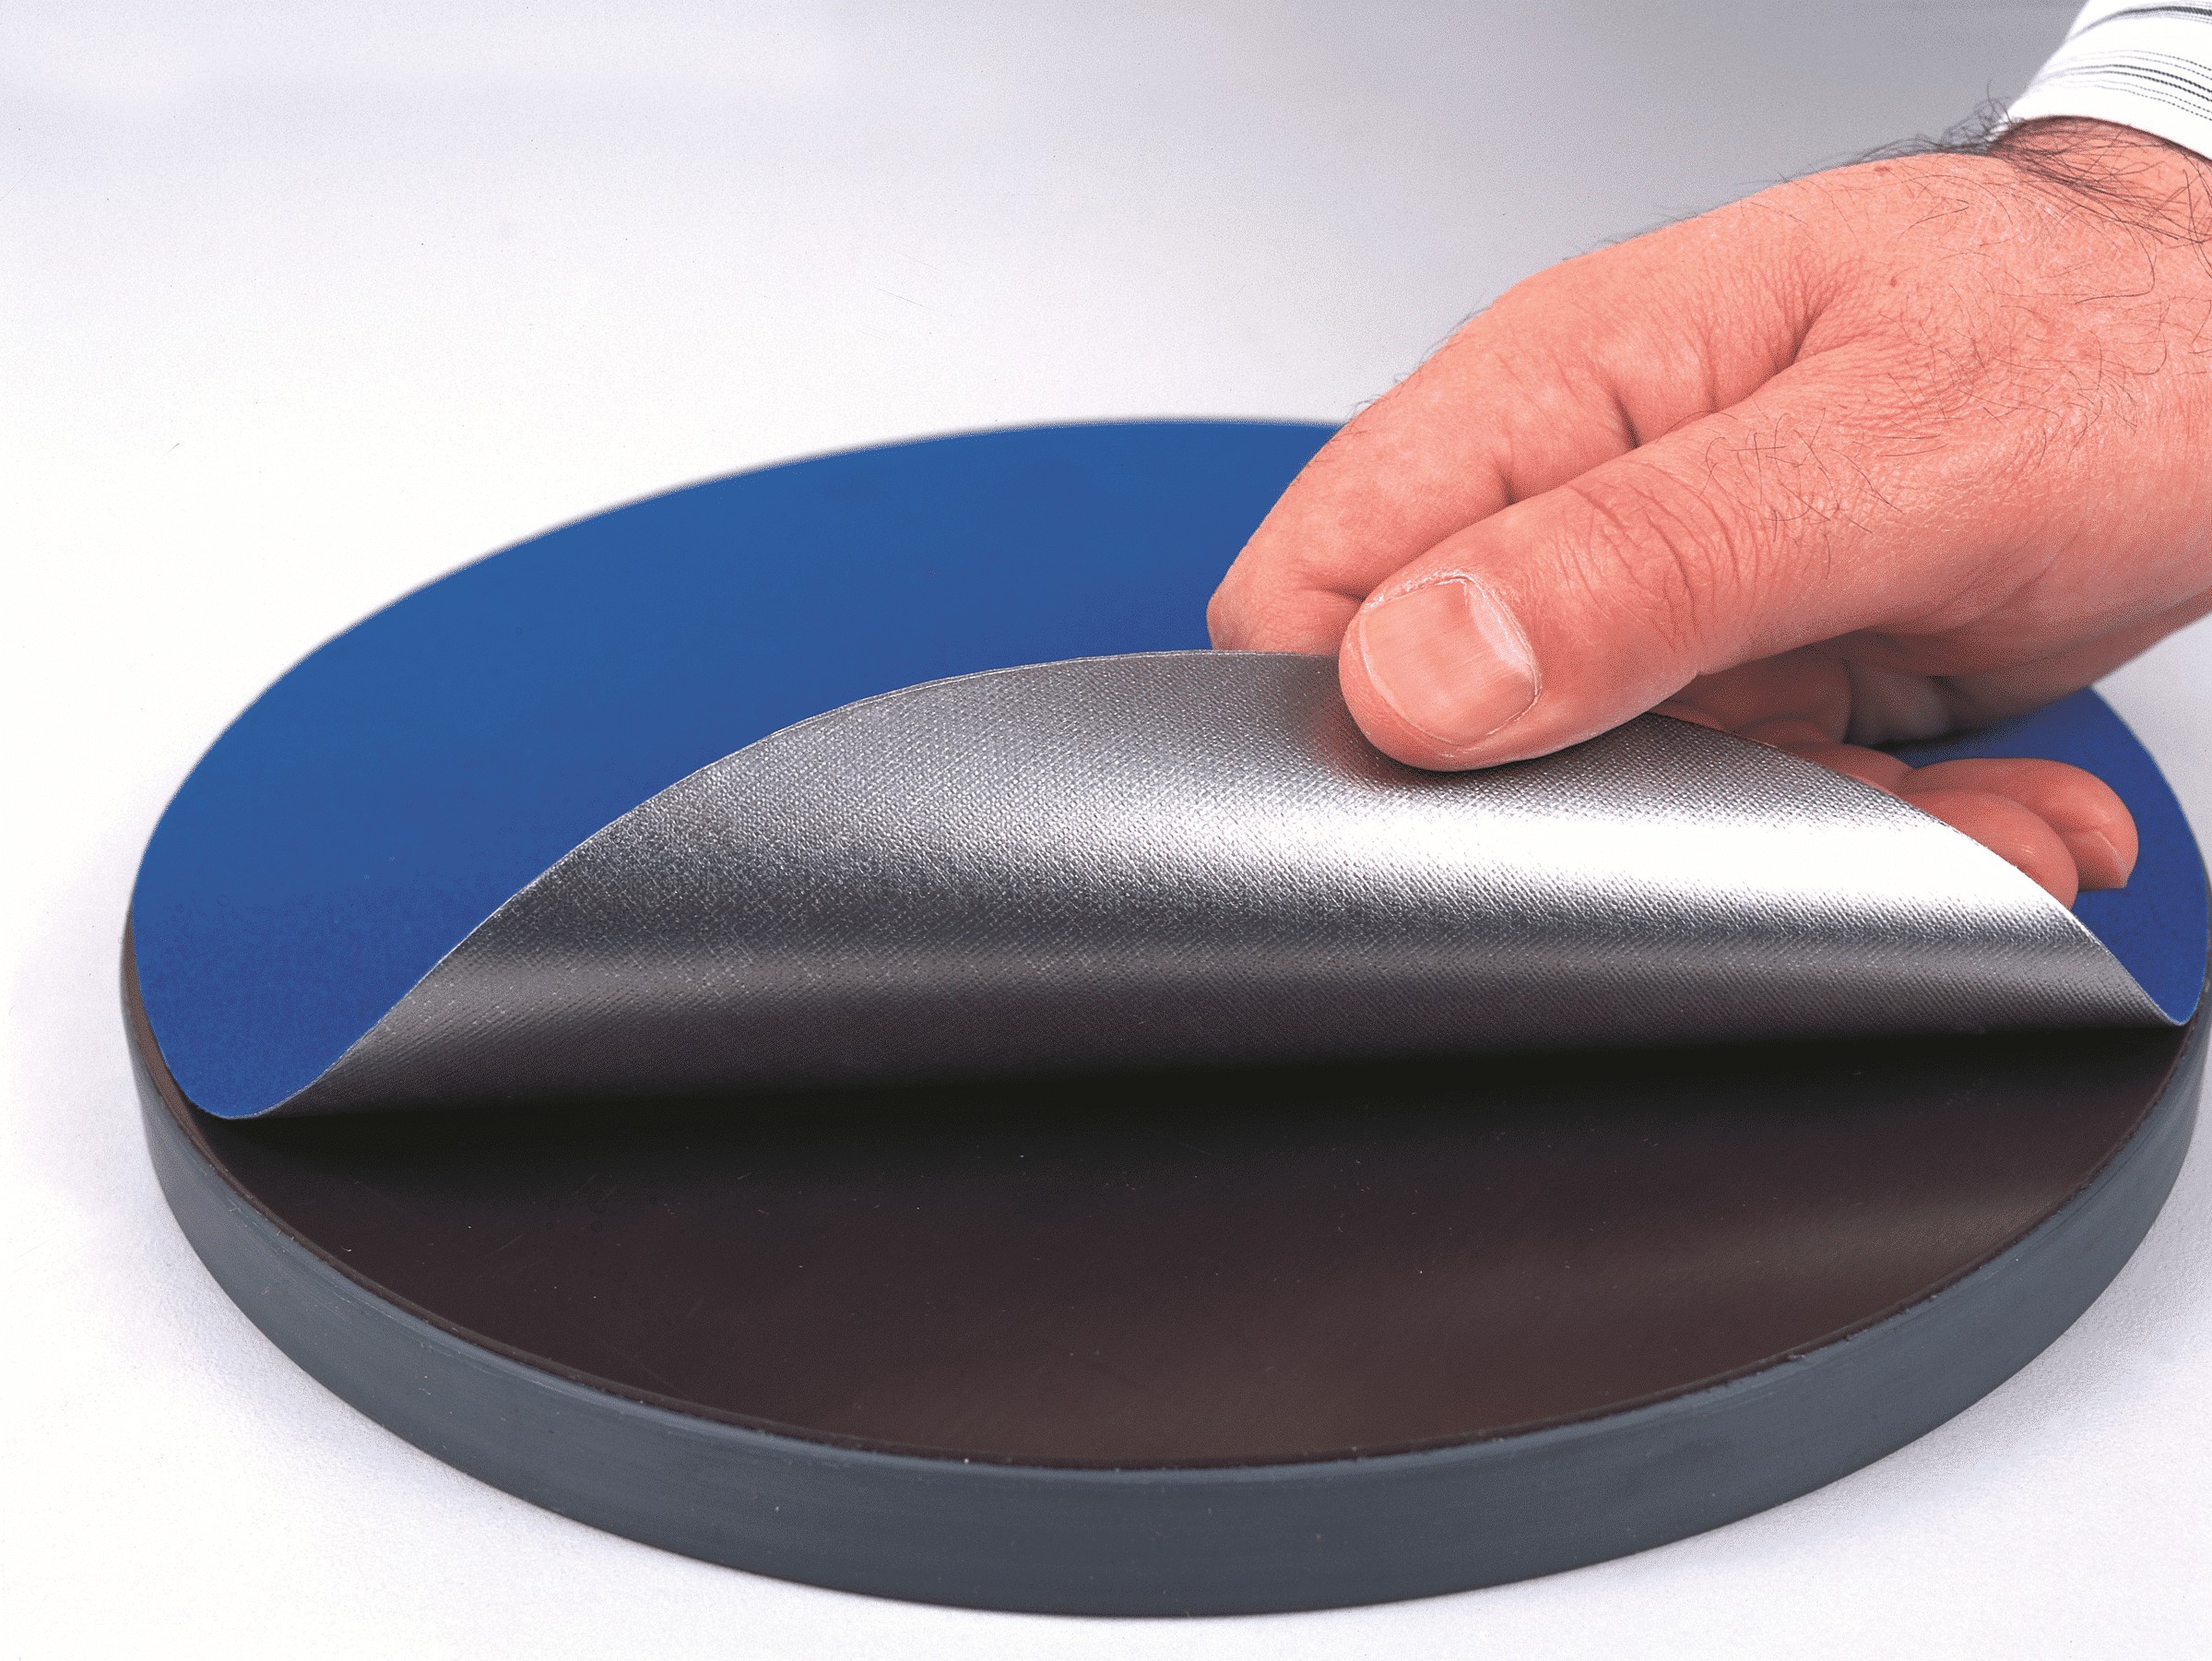
Polishing Cloth Application Instruction