Metallographic Etching: Key Techniques, Safety Tips & Choosing the Right Etchant
Metallographic Etching: Key Techniques, Safety Tips & Choosing the Right Etchant
Metallographic etching reveals concealed microstructures in metals that recount the entire tale of material performance and properties. This essential technique is utilized daily in materials laboratories. The procedure brings to light grain boundaries, phases, and inclusions that would otherwise remain invisible. Even the most sophisticated microscopy cannot discern important microstructural details without etching. Such details are responsible for material strength, corrosion resistance, and fatigue life.
Successful metallographic analysis calls for skill in different etching techniques and proper etchant selection for the particular material being worked with. Safety is also an important consideration because most popular etchants consist of hazardous acids or bases that must be handled with care. This article provides a background to metallographic etching of steel and other alloys. We’ll discuss specialized methods for special materials and provide practical advice on etchant selection based on our laboratory’s personal experience. The material also presents important safety procedures and troubleshooting hints that ensure good, consistent results in metallographic preparations.
Fundamentals of Metallographic Etching
A finished metallographic sample conceals its microstructural secrets below the surface. The ideally prepared metal surface reflects light evenly. It is therefore not possible to separate individual grains, phases, and structural features with a microscope. Metallographic etching makes visible these concealed details by selectively altering the surface to produce visual contrast.
What is Metallography? Definition, Techniques & Industrial Applications
Purpose of Etching in Microstructure Revelation
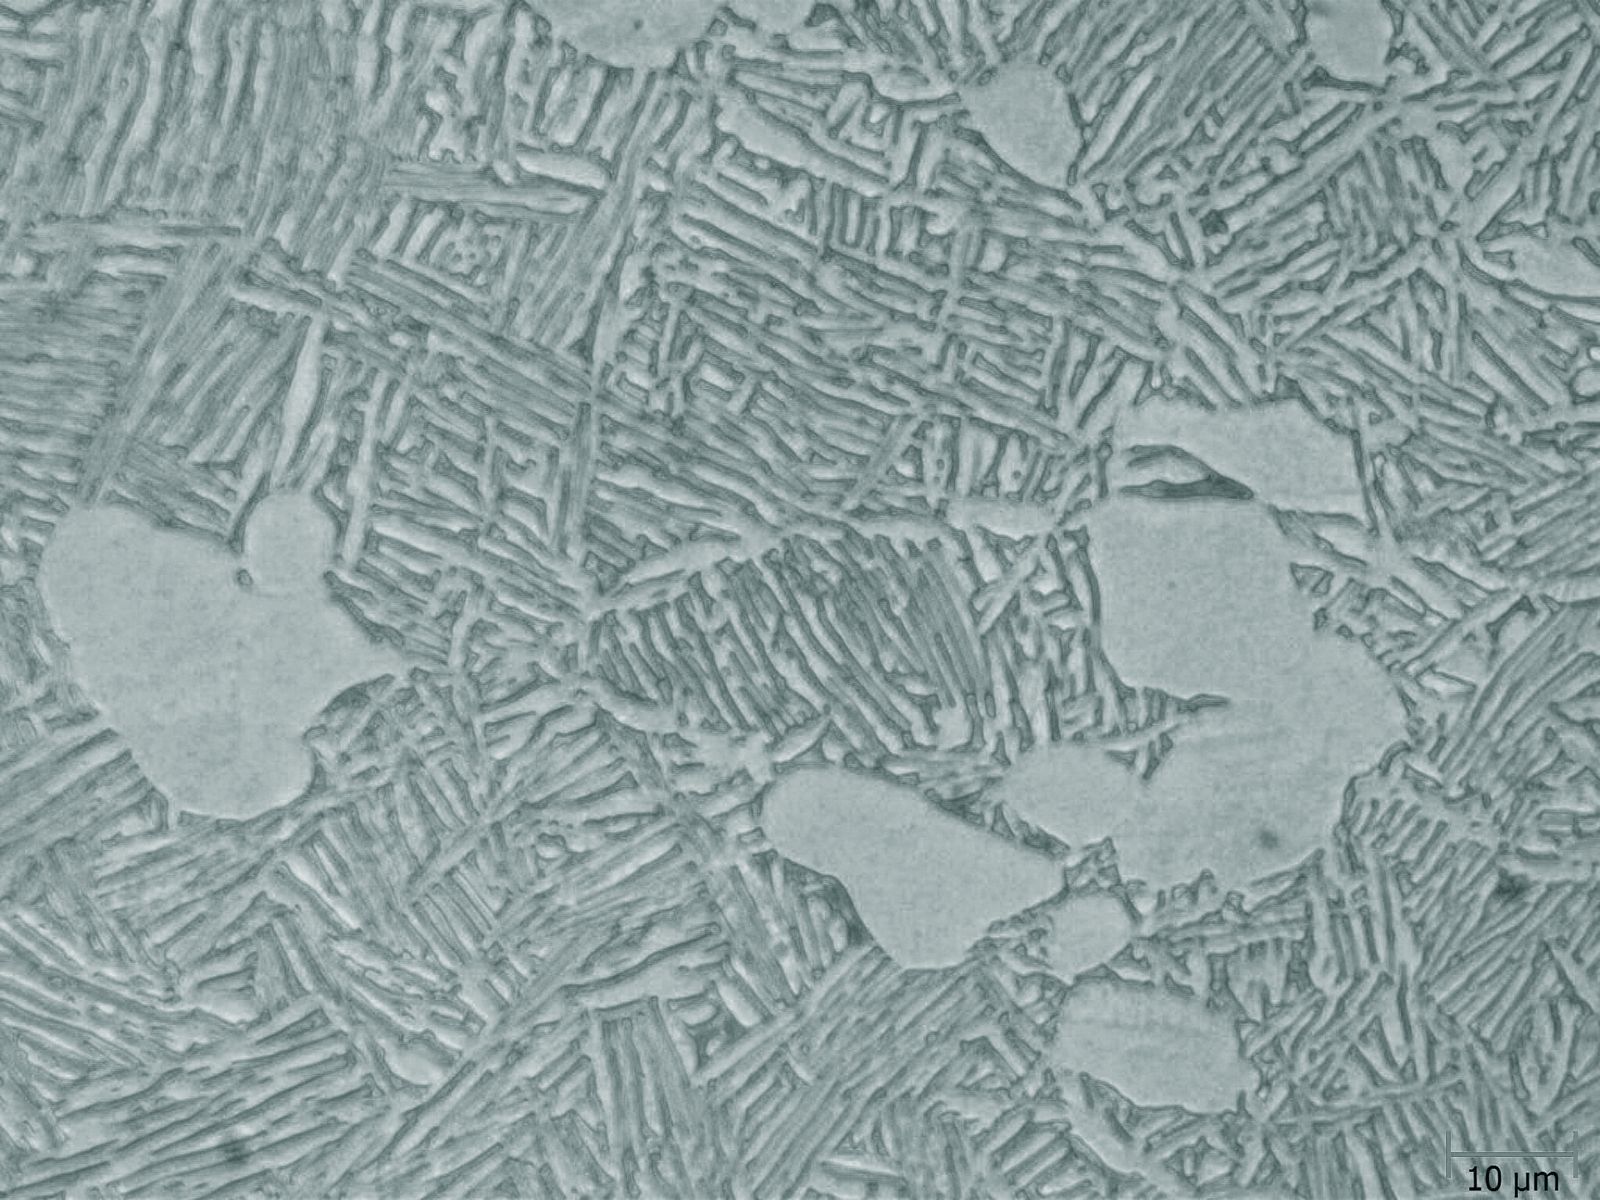
The etching process changes the specimen’s surface profile or optical properties. It works mainly at grain boundaries, phases, or grain surfaces. Different areas of the microstructure stand out through selective chemical or electrolytic attack. A polished surface shows only basic details like residue analysis, graphite density in cast iron, cracks, porosity, and certain secondary phase distribution.
The majority of metallurgical tests require etched surfaces. The concealed microstructural elements are revealed only after etching:
- Grain size measurement
- Deformation structure analysis
- Segregation identification
- Case hardening depth (carburization-nitriding)
- Decarburization assessment
The etching procedure converts a mirror-like surface to a surface full of microstructural information. Light reflects differently from different structural features and produces the contrast necessary for microscopic observation.
Grain Boundary Attack and Phase Differentiation
Chemical solution attacks various areas of the microstructure at different rates. The selective attack occurs due to electrochemical potential differences between:
- Grain boundaries and grain centers
- Various stages in the material
- Regions of varying crystallographic orientations
Grain boundaries etch more rapidly than grain interiors since they possess greater energy. Every phase in an alloy responds differently to the same etchant because of its chemical composition and crystal structure.
Two main mechanisms create contrast during etching:
Dissolution etching selectively attacks certain regions at grain boundaries, surfaces, or phases. The etchant dissolves material at different rates from different microstructural features.
Precipitation etching (or color etching) produces a thin layer on the surface. The thickness of the layer depends on the chemical composition or crystallographic orientation of grains. The variations in thickness cause optical interference effects that reveal microstructural details by color contrast.

Pre-etch Cleaning and Surface Preparation
The sample must be prepared properly prior to etching. The specimen must be polished smooth with no deformations or scratches. Minor scratches may be suitable for some analyzes but will conceal significant microstructural details following etching.
The preparation is as follows:
- Mechanical polishing and grinding produces a flat surface with little deformation
- Final polishing eliminates remaining scratches
- Proper cleaning removes all polishing residue and contaminants
Electrolytic etching necessitates the specimen to be a uniform conductor of electricity. Mechanical preparation flattens the surface but may induce deformation. Electrolytic polishing prior to etching minimizes deformation but may round edges and wash out phases.
The quality of the surface before etching controls the effectiveness of the etching. A poorly prepared surface will reveal erroneous or incomplete microstructural information, regardless of the etchant you choose to use.
Key Etching Techniques and Their Applications
The selection of the etching method is of prime importance in metallographic examination. Each technique has its own advantages which reveal certain microstructural characteristics. A well-performed method can transform a plain polished surface into a comprehensive microstructural map that displays the processing history and properties of the material.
Chemical Etching vs Electrolytic Etching
Chemical etching involves full immersion of a prepared sample in an etching fluid. The process is simple and operates by selective dissolution. The etchant attacks various microstructural features at different rates according to their electrochemical character. Success in chemical etching relies on:
- A well-polished specimen surface
- The correct etching solution for the given material
- Precise control of exposure time and sometimes temperature
How to Prepare Metallographic Samples – Complete Step-by-Step Guide (With Expert Tips)
Electrolytic etching is different. It requires a homogeneous conductive workpiece that is used as an anode in a galvanic cell. Electrolytic etching removes material from the specimen surface by electrochemical reactions in a controlled manner. It has the capability of voltage adjustment and is an excellent method to achieve greater control than chemical etching, particularly with difficult-to-etch materials.
Both techniques produce contrast by selective attack. However, electrolytic etching provides you with greater control in some situations, especially with highly corrosion-resistant alloys.
Color Tint Etchants for Phase Contrast
Color tint etchants (or precipitation etchants) are unique. They form thin surface films rather than simply dissolving material. The films are of varying thickness depending on crystallographic orientation or chemical composition of phases. This produces optical interference effects that reveal microstructural details by color contrast.
Beraha and Lichtenegger reagents are excellent for high-alloy steels. They produce strong color contrast between phases that may appear similar when using standard etchants. Modified Klemm’s reagents assist copper alloys to exhibit characteristic colors that highlight phase distribution.
Macroscopic vs Microscopic Etching
Macroscopic etching deals with large features visible to the naked eye or at low magnification (up to 25x). This technique does not require highly polished surfaces – ground surfaces are suitable. It reveals features such as segregation bands, flow lines, or weld areas.
Microscopic etching works differently. It needs highly polished surfaces and produces contrast for features you examine at magnifications as high as 1,000x when you use light microscopy or higher when you use electron microscopy. This makes grain boundaries, phase distributions, and small microstructural details visible that macroscopic examination cannot reveal.
Electrolytic Polishing Before Etching
Electrolytic polishing provides an alternative to mechanical polishing that minimizes surface deformation. This is very important if you’re investigating deformation-sensitive microstructures. Despite that, this method has some trade-offs:
- Surface deformation is nowhere near as much as mechanical methods
- Edges may become rounded and impact boundary areas
- Some stages may wash out
The Barker method is suitable for aluminum-based materials. It is a combination of electrolytic etching and polarized light microscopy. The specialized technique produces an anodized layer on the polished sample surface. This layer exhibits grain structure by orientation contrast under polarized light without conventional chemical attack.
The most significant issue with electrolytic methods arises from incorrect voltage, exposure duration, or electrolyte concentration. Precise control of parameters is thus of utmost importance for satisfactory outcomes.
Choosing the Right Etchant for Your Material
Metallographic analysis success relies on the selection of the correct etchant for your material. Even with perfectly prepared specimens, you will not obtain good results if you utilize the wrong etchant. Now let us discuss the best etchants for typical engineering materials and find out about their composition and application.
Nital Etching for Carbon and Alloy Steels
Nital, a mixture of nitric acid and ethanol, is the preferred etchant for carbon and alloy steels. A solution of 2-5% nitric acid in ethanol attacks the ferrite grain boundaries but has little effect on cementite. This selectivity is ideal to reveal:
- Ferrite grain boundaries in carbon steels
- Pearlite and martensite microstructures
- The transition area between various heat-treated areas
Etching time may range from seconds to minutes depending on the carbon content and heat treatment of the steel. Steels containing more carbon require shorter exposure time to prevent over-etching. The efficiency of Nital drops with increasing alloy content, so it is not the ideal for highly alloyed steels.
What is the Vickers Hardness Test? | Method, Applications&Advantages
Keller’s Reagent for Aluminum Alloy Etching
Keller’s Reagent works very well with aluminum and aluminum alloys. The following is what is used in this multi-acid solution:
| Component | Amount |
| Distilled water | 190 ml |
| Nitric acid | 5 ml |
| Hydrochloric acid | 3 ml |
| Hydrofluoric acid | 2 ml |
Best results are obtained by immersing specimens for 10-30 seconds in fresh etchant. This solution is equally effective for titanium alloys with similar timing. The acids in this combination attack grain boundaries and intermetallic phases to produce good contrast between the microstructural features of aluminum.
Kalling’s No.1 and No.2 for Stainless Steel Etching
Stainless steels are difficult to etch due to their resistance to corrosion. That is why Kalling’s reagents are so valuable:
Kalling’s No.1 combines 33 ml distilled water, 1.5 grams CuCl₂, and 33 ml ethanol with HCl. The combination is most effective on martensitic stainless steels. It darkens martensite while imparting a different tint to ferrite. You’ll achieve repeatable results with immersion etching at 20°C.
No.2 by Kalling employs a more potent mixture: 5 grams CuCl₂, 100 ml HCl, and 100 ml ethanol. This variant excels when applied to duplex stainless steels, nickel-copper alloys, and superalloys. Copper chloride generates contrast via a replacement reaction on the surface.
Murakami’s and Picral for Carbide Detection
Murakami’s reagent and Picral stand out when you need to reveal carbides in steels and other alloys. Murakami’s reagent contains potassium ferricyanide and sodium hydroxide. It attacks carbides but leaves the matrix mostly alone, which makes it perfect for showing carbide distribution in tool steels and high-carbon alloys.
Picral (4% picric acid in ethanol) is superior to Nital for revealing cementite in pearlitic microstructures. It produces greater contrast between ferrite and carbides, making measurement of carbide shape and distribution easier.
Ferric Chloride Etch for Inclusion Detection
Ferric chloride etchants assist in locating and examining non-metallic inclusions in alloys of any kind. These etchants cause inclusions to stand out from the background without any damage to them. This preferential action preserves the inclusion shape while rendering them easy to observe.
The strength of ferric chloride solutions varies with the base metal. Copper alloys are suitable with a 10% ferric chloride solution in alcohol. Steel requires some addition of hydrochloric acid to activate the ferric chloride. The precise technique varies with the type of inclusion you’re searching for and the composition of the material.
Safety Tips for Handling Etchants and Equipment
Safe handling of metallographic etchants warrants equal consideration as the etching operation itself. The majority of etchants are strong chemicals that can severely damage your health if not treated properly. What I have learned from working in metallography laboratories is that safety procedures must be followed carefully.
Ventilation and Fume Hood Requirements
A well-operating fume hood is the life-line of lab safety while handling etchants. Most etching solutions give off noxious vapors that aggravate your respiratory system or create serious health problems. You need to conduct all etching tasks in a fume hood that draws vapors away from your breathing zone.
The fume hood must have a face velocity of 80-120 feet per minute. The airflow performance must be checked regularly to ensure your safety. The sash must remain at the suggested height during operations. Never operate a defective fume hood, regardless of what the etching process may appear to be.
Etching Hazards: Acid vs Alkaline Etchants
Acid and alkaline etchants present distinct hazards that require special safety precautions. Acid etchants such as nital and Keller’s reagent can cause severe burns and tissue damage upon contact. Hydrofluoric acid, which is used in etchants for aluminum alloys, is particularly dangerous. It readily penetrates the skin and produces deep tissue destruction with minimal pain until severe damage is done.
Alkaline etchants like sodium hydroxide solutions also burn but with warning pain immediately. Both require cautious handling. You must neutralize acid spills using bicarbonate solutions. Alkaline spills require dilute acetic acid for neutralization.
Etchant Shelf Life and Storage Guidelines
Proper storage influences the performance of your etchants and their safety. Keep them in well-labeled, non-reactive containers, such as in dedicated chemical cabinets. Most etchants deteriorate with age – to quote an example, Keller’s reagent is best used fresh.
Isolate incompatible chemicals to avoid hazardous reactions. Maintain a current inventory and discard aged solutions according to local regulations.
Personal Protective Equipment (PPE) in Metallography
PPE provides your final defense against chemical exposure. When handling etchants, you must wear:
- Chemical-resistant gloves that match your specific etchants
- Face shield or safety goggles with side shields
- Lab coat or chemical-resistant apron
- Closed-toe shoes
There should be readily accessible emergency equipment such as eyewash stations and safety showers. Despite these measures, always adhere to your organization’s particular health and safety regulations for your laboratory setting.
Troubleshooting Common Etching Issues
Metallographic etching may encounter problems that influence outcomes despite cautious preparation. Rapid recognition of everyday issues conserves time and resources and guarantees precise microstructural analysis.
Incorrect Electrolyte or Etchant Composition
Incorrect electrolyte or etchant renders a surface structure’s necessary parameters unverifiable. This manifests as unsatisfactory contrast, non-uniform attack, or lack of microstructural detail. Cross-check your etchant composition with literature sources rather than depending on memory. Multicomponent solutions such as Keller’s reagent or Kalling’s No.2 are sensitive – slight errors in formulation can significantly alter their behavior. Preparation of fresh etchant frequently resolves irregular results because numerous solutions deteriorate with time.
Etching Time Optimization and Over-etching
Over-etching is one of the most frequent metallographic errors that conceals microstructural information rather than revealing it. Strong etchants such as nital require timing – ideal results and over-etching can be separated by a matter of seconds. The following is how to optimize etching times:
- Start with shorter intervals than recommended
- Examine the specimen between short exposures
- Record successful timing for future reference
Control of temperature influences rates of reaction greatly. Elevated temperatures accelerate the process and may result in uneven attack.
Voltage and Exposure Control in Electrolytic Etching
Voltage and exposure times are important factors in electrolytic etching results. Excessive voltage produces gas that can puncture the specimen surface, and too low voltage reveals no visible structure. The majority of electrolytic procedures have an optimal voltage range in which selective attack occurs without excess removal of material. Exposure time requires fine-tuning to reveal microstructural features clearly but not to over-process.
Surface Deformation from Improper Polishing
Inadequate specimen preparation creates scratches and deformation that will obscure or distort the microstructure on etching. Surface irregularities provide attack sites that may misrepresent the actual microstructure. Mechanical preparation techniques must compromise between practical requirements and acceptable levels of deformation. Deformation-sensitive analyzes are improved by electrolytic polishing prior to etching, although this is at the expense of edge rounding and potential phase washout.
Metallographic etching is the life-blood of materials analysis. Etching brings out the essential microstructural details beneath the polished surface. In this article, we’ve witnessed how good etching transforms featureless metal surfaces into detailed microstructural maps that reveal a material’s entire story of properties and performance history.
Automated Sample Preparation: Cut Operator Impact While Boosting Time & Cost Savings
Becoming skilled at etching techniques depends on several connected elements. Your specimen preparation directly shapes etching quality – even the best etchant can’t fix poor polishing. The right etchant must match your specific material and the microstructural features you want to reveal. Nital works well for carbon steels but doesn’t cut it with highly alloyed materials. Specialized solutions like Kalling’s reagents handle tough-to-etch stainless steels effectively.
Safety must go hand-in-hand with technical procedures. Many common etchants contain hazardous acids or bases that just need proper ventilation, storage, and personal protective equipment. Your lab’s safety protocols deserve the same attention as the etching procedures.
The majority of troubleshooting problems arise from incorrect etchant composition, incorrect timing, or improper surface preparation. Differences of a few seconds of etching time or minor variations in solution concentration can be the difference between good microstructure revelation and none at all.

Metallographic etching is a fine blend of science and art. Technical information provides the foundation, but successful practice still requires trial and error, detail, and perhaps that intuition that develops with experience. As difficult as the technique may be, it allows us to look beneath the surface. It enables us to understand those underlying structure-property relationships that determine the performance of materials in infinite applications.
FAQs about Metallographic Etching
Q1. What are the major safety measures for dealing with etchants in metallography? Always operate in a well-ventilated region, preferably a fume hood. Use proper personal protection gear such as chemical-resistant gloves, safety goggles, and a lab coat. Properly store etchants in labeled containers and never let acids come into contact with your skin or breathe in their fumes.
Q2. What etchant is routinely used for revealing microstructures in alloy and carbon steels? Nital, which is a combination of nitric acid and ethanol, is the standard etchant for carbon and alloy steels. It’s used to reveal ferrite grain boundaries, pearlite, and martensite structures effectively. The concentration is usually 2-5% nitric acid in ethanol.
Q3. How do I select the correct etchant for stainless steel? For stainless steels, Kalling’s reagents are very effective. Kalling’s No.1 is suitable for martensitic stainless steels, and Kalling’s No.2 is more appropriate for duplex stainless steels and superalloys. The selection is based on the particular type of stainless steel and the microstructural details you wish to reveal.
Q4. What are some of the frequent problems faced in metallographic etching? Some typical problems are over-etching that hides microstructural details, wrong etchant composition giving unsatisfactory contrast, and surface deformation due to improper polishing.Voltage and exposure control problems in electrolytic etching can also influence results.
Q5. How do I optimize etching time to prevent over-etching? To optimize etching time, begin with shorter periods than suggested. Inspect the specimen between short exposures and extend the time if necessary. Record successful timing for future use. Keep in mind that temperature can influence reaction rates, so use consistent conditions.


