Metallographic Cold Mounting Process: Expert Guide, Resin Selection & Void-Free Techniques
Metallographic Cold Mounting Process: Expert Guide, Resin Selection & Void-Free Techniques
The metallographic cold mounting process represents a critical step in proper sample preparation for materials analysis. Achieving perfect metallographic samples can be challenging, especially with heat-sensitive materials that would otherwise deform or alter under traditional hot mounting methods. We’ve found that mastering cold mounting techniques is essential for preserving the true microstructure of delicate specimens, particularly when examining surface details, coatings, or heat-treated components.
Cold mounting for metallography entails mounting samples in room-temperature curing resins and, therefore, not subjecting them to thermal damage. Yet, as deceptively simple as this process may seem, close attention is needed to avert typical problems such as air bubbles, incomplete curing, or edge retention problems. Also, the choice of the right cold mounting resin—epoxy or acrylic—greatly affects your outcome. In fact, the distinction between sound and deceptive metallographic analysis usually boils down to such preparation decisions.
Metallographic Hot Mounting Secrets: Hot Mounting Methods, Resin Selection & Troubleshooting Tips
In this detailed guide, we’ll go through each step in the metallographic cold mounting process—from the selection of resin and best mixing ratios to vacuum impregnation methods and troubleshooting of common defects. In particular, we’ll provide practical tips on how to obtain void-free mounts with good edge retention, even with difficult specimens. Whether you’re just starting out in metallography or trying to optimize current methods, this guide will enable you to consistently achieve high-quality mounts for precise microstructural analysis.
Understanding Cold Mounting in Metallography
Cold mounting is a staple method in metallographic sample preparation, presenting a systematic way of embedding specimens in room-temperature curing resins. In comparison to its thermal counterpart, cold mounting dispenses with heat exposure while still giving the necessary support for grinding, polishing, and microscopic analysis.
Purpose of cold mounting in sample preparation
The major objective of the metallographic cold mounting procedure is to preserve the original microstructure of samples throughout preparation. The method provides a protective matrix for specimens, enabling them to be handled safely and positioned accurately for analysis. Cold mounting also enables the examination of unusual shapes that would otherwise be hard to grip during polishing.

Cold mounting fulfills several important roles in metallography. Firstly, it offers mechanical support that maintains the structural integrity of the sample during preparation. Secondly, it produces a standard cylindrical form that is easily accommodated by automated polishing devices. Thirdly, cold mounting allows for edge retention—of paramount importance when investigating surface treatments, coatings, or case-hardened layers.
Most importantly, cold mounting preserves the true microstructure of specimens. In metallographic examination, we want to expose genuine material properties without imposing artifacts or changes. The fact that there is no heat in cold mounting guarantees that heat-sensitive materials are not affected, with their original metallurgical properties being preserved for proper analysis.
What is Metallography? Definition, Techniques & Industrial Applications
When to choose cold mounting over hot mounting
The decision between cold and hot mounting depends largely on sample characteristics and analysis objectives. Cold mounting becomes the preferred option in several situations:
- When analyzing heat-sensitive materials such as polymers, low-melting point alloys, or heat-treated parts
- For samples that already have thermal histories which can be altered by subsequent heating
- When analyzing corrosion products that can change at elevated temperatures
- For porous materials requiring complete resin penetration
- \tWhile analyzing mounted electronic components or coated surfaces
While hot mounting provides reduced processing times (generally 15-30 minutes compared to hours for cold mounting), it subjects samples to temperatures of 150-180°C and pressures of 290 bar or higher. Cold mounting, on the other hand, prevents these thermal and pressure stresses altogether and is therefore optimum for retaining sensitive microstructures.
When—and Why—Choose Cold Mounting?
| Typical Situation | Metkon Resin(s) | Key Advantage |
| Heat-sensitive plastics, low-melt solders | EPOCOLD (29-505 resin + 29-506 hardener) | <0.1 % shrinkage, peak 40-60 °C |
| Porous castings, sintered parts (vacuum impregnation) | EPOCOLD | Low viscosity, long pot life |
| Rush failure analysis (polish in <20 min) | DMT 35 (powder 29-501 + fluid 29-502) | 5 min gel, peak 75-80 °C |
| Documentation with crystal-clear edges | DMT 20 (29-511/29-512) | Transparent, 10 min cure |
| SEM/EDS on non-conductors | DMT CON (29-513/29-514) | Graphite-filled, resistive path |
| Hard-edge, green contrast mounts | DMT ACE (29-515/29-516) | 6 min cure, vivid colour |
Metkon Cold-Mount Resin Selector
| Metkon Code | Chemistry | Mix Ratio (R:H) | Gel Time* | Peak Temp | Colour | Best-Fit Applications |
| EPOCOLD (29-505 R / 29-506 H) | Epoxy | 5 : 1 | 8 h | 40-60 °C | Clear | Edge-critical, vacuum impregnation |
| DMT 20 (29-511 P / 29-512 F) | Acrylic | 2 : 1 | 10 min | 80-87 °C | Semi-Transparent | Inclusion rating, documentation |
| DMT 35 (29-501 P / 29-502 F) | Acrylic | 2 : 1 | 5 min | 75-80 °C | Semi-transparent | High-volume QA |
| DMT CON (29-513 P / 29-514 F) | Conductive acrylic | 1 : 1 | 18 min | 100-106 °C | Black | SEM/EDS on polymers & ceramics |
| DMT ACE (29-515 P / 29-516 F) | Acrylic | 2 : 1 | 6 min | 82-88 °C | Green-transparent | Teaching samples, vivid contrast |
*All gel times at 22 °C; curing accelerates ~30 % per 10 °C temperature rise.
Cold embedding metallography for fragile or heat-sensitive samples
Brittle specimens pose special problems for metallographic preparation. Some materials, such as brittle ceramics, thermal sprays, powder metallurgy parts, and some composites, will fracture, crumble, or delaminate readily during standard preparation. For these, cold embedding metallography is the only way to preserve structural integrity.
Cold mounting is also advantageous for heat-sensitive materials. There are some alloys, especially zinc-based, tin-based, or lead-based alloys, whose melting points are relatively low and close to the temperatures used in hot mounting. In addition, already heat-treated materials—such as precipitation-hardened aluminum alloys or quenched steels—may experience microstructural changes when exposed to hot mounting temperatures, thereby decreasing the fidelity of analysis.
Cold embedding also enables vacuum impregnation, where specimens are put in a vacuum chamber prior to or during the application of resin. This method pushes resin into pores, cracks, and cavities, giving better support for weak areas. Consequently, even very porous materials such as powder metallurgy parts, thermal spray coatings, and archeological samples can be prepared correctly without inflicting structural damage or losing important features.
Selecting the Right Cold Mounting Resin
The choice of the right resin for cold mounting in metallography directly affects sample quality, edge retention, and final analytical results. Considering hardness, transparency, and curing time ensures ideal specimen preparation based on individual material properties.
Epoxy vs. acrylic: hardness, shrinkage, and cure time
Epoxy and acrylic resins are the two main choices for metallographic cold mounting, each with its own specific benefits. Epoxy resins generally have better hardness (70-90 Shore D) and low shrinkage (0.5-1%), which makes them well-suited for edge retention and porous specimens. However, they have slower cure times, typically 8-24 hours at room temperature.
Acrylic resins, meanwhile, cure substantially faster (20-40 minutes) but exhibit greater shrinkage (up to 7%) and lower hardness (60-75 Shore D). Therefore, acrylics excel in applications where processing speed outweighs precision edge retention requirements.
| Property | Epoxy Resins | Acrylic Resins |
| Hardness | 70-90 Shore D | 60-75 Shore D |
| Shrinkage | 0.5-1% | 3-7% |
| Cure Time | 8-24 hours | -20 minutes |
| Transparency | Excellent | Good to excellent |
| Edge Retention | Superior | Moderate |
| Heat Generation | Minimal | Significant |
Cold mounting resin types and their applications
Beyond the basic epoxy/acrylic classification, several specialized formulations address specific metallographic requirements:
Standard epoxies provide excellent edge retention and minimal shrinkage, suitable for routine metallography of metals, ceramics, and composites. Low-viscosity epoxies penetrate porous materials effectively, making them appropriate for powder metallurgy components and fragile specimens.

Fast-cure epoxies provide shorter cure times (2-4 hours) with moderate hardness, as a compromise between conventional epoxies and acrylics. Conductive epoxies with metallic fillers enable SEM examination to be carried out without further coating procedures.
In acrylic options, self-curing acrylics provide rapid processing for typical samples where edge retention is less critical. UV-curable acrylics provide controlled cure time by exposure to ultraviolet light, typically curing within 5-15 minutes.
Optimal mixing ratio (resin:hardener) for consistent results
Diligent adherence to manufacturer-specified mix ratios is nonetheless necessary to provide uniform mechanical properties. The majority of epoxy systems are weight-ratio (commonly 5:1 or 10:1 resin:hardener) mixed, whereas acrylics are commonly volume-ratio (generally 2:1 powder:liquid) mixed.
Incorrect mixing ratios can lead to:
- Incomplete curing (excess hardener or insufficient resin)
- Reduced hardness (insufficient hardener)
- Excessive shrinkage (improper ratio)
- Heat damage to specimens (especially with acrylics)
For best accuracy, use digital scales (±0.1g precision) for weight-based systems or calibrated measuring equipment for volume-based mixes. Then, mixing thoroughly (60-90 seconds) guarantees complete initiation of chemical reaction without entraining excessive air bubbles.
How to Prepare Metallographic Samples – Complete Step-by-Step Guide (With Expert Tips)
Cure-time vs. hardness chart for epoxy and acrylic resins
Cure time and hardness development have different relationships for epoxy and acrylic systems. Acrylics achieve about 75% of ultimate hardness in 30 minutes and are fully hard in 24 hours. Epoxies, on the other hand, develop hardness more slowly, achieving only 50-60% hardness after 8 hours but continuing to harden up to 72 hours.
Temperature significantly influences cure rates—each 10°C increase typically doubles reaction speed. Hence, curing at 30°C rather than 20°C can reduce epoxy cure times by approximately 50%. Accordingly, temperature control during curing becomes essential for reproducible results, particularly in laboratory environments subject to fluctuations.
Finally, the choice between higher speed of processing (acrylics) and better mechanical properties (epoxies) is based on your particular metallographic goals, sample type, and analysis needs. Thoughtful consideration of all these parameters guarantees the best mounting media choice for high-quality, consistent metallographic specimens.
Step-by-Step Cold Mounting Process
Carrying out the metallographic cold mounting operation needs accuracy, carefulness, and step-by-step methodology to obtain the best outcomes. My experience has been that using a systematic process greatly enhances mount quality and reduces typical defects.
Sample cleaning and mold preparation
To start with, proper sample preparation is the key to successful cold mounting. I thoroughly clean specimens using ultrasonic cleaning in acetone or alcohol to remove oils, fingerprints, and impurities that could prevent good adhesion. In the case of sensitive samples, I use less aggressive solvents like isopropyl alcohol. I let specimens be completely dry after cleaning prior to placing them, as moisture can interfere with the curing of resin.
Mold selection directly impacts mount quality. I typically use silicone or polyethylene molds for their excellent release properties and reusability. Before placing the sample, I apply a thin layer of release agent to the mold interior, ensuring it doesn’t pool. Properly positioning the sample is critical—I use mounting clips or double-sided tape to maintain precise orientation throughout the pouring process.
Mixing and pouring resin: timing and technique
With the sample in position, I combine the mixture of resin in exact manufacturer-specified ratios. For epoxies, I measure components by weight, utilizing a precision scale (±0.1g). For acrylics, measuring cups, which have been calibrated, are used. Mixing is to be carried out cautiously:
- Mix slowly but thoroughly (60-90 seconds) to avoid excessive formation of air bubbles
- Scrape sides and bottom of containers to include all material
- Pour mixed resin along the mold wall rather than directly onto the sample
- Pour in one continuous motion to reduce bubble entrapment
Following pouring, I tap the mold lightly against the work surface or utilize a vibration table to help bubbles rise to the surface. For porous samples, I typically perform this step under a vacuum chamber to help promote impregnation.
Temperature control during curing
During curing, temperature control is still critical. Optimum curing is achieved between 20-25°C (68-77°F). At elevated temperatures, exothermic reactions may cause excessive heat buildup and damage to heat-sensitive specimens. Below 18°C (64°F), cure times are considerably longer.
For acrylic resins, which produce more heat on curing, I occasionally employ water baths to remove excess heat. For epoxies that need high temperature post-curing, I employ laboratory ovens with controlled temperature, usually 40-60°C (104-140°F).
Cold curing mounting: typical durations and conditions
Curing times vary significantly with resin type and ambient conditions. Treatment times are typically 30-40 minutes to harden enough for demolding for acrylic resins but 24 hours to be fully cured. Epoxy systems take from 8-24 hours to demold and up to 72 hours to be fully cured.
For optimal results, I maintain consistent humidity (below 60% RH) during curing because excessive moisture can disrupt proper hardening. I also leave specimens alone during the initial curing phases to prevent shifting. After sufficient hardening, I demold carefully by flexing the mold sides away from the specimen rather than pulling on the mount directly.
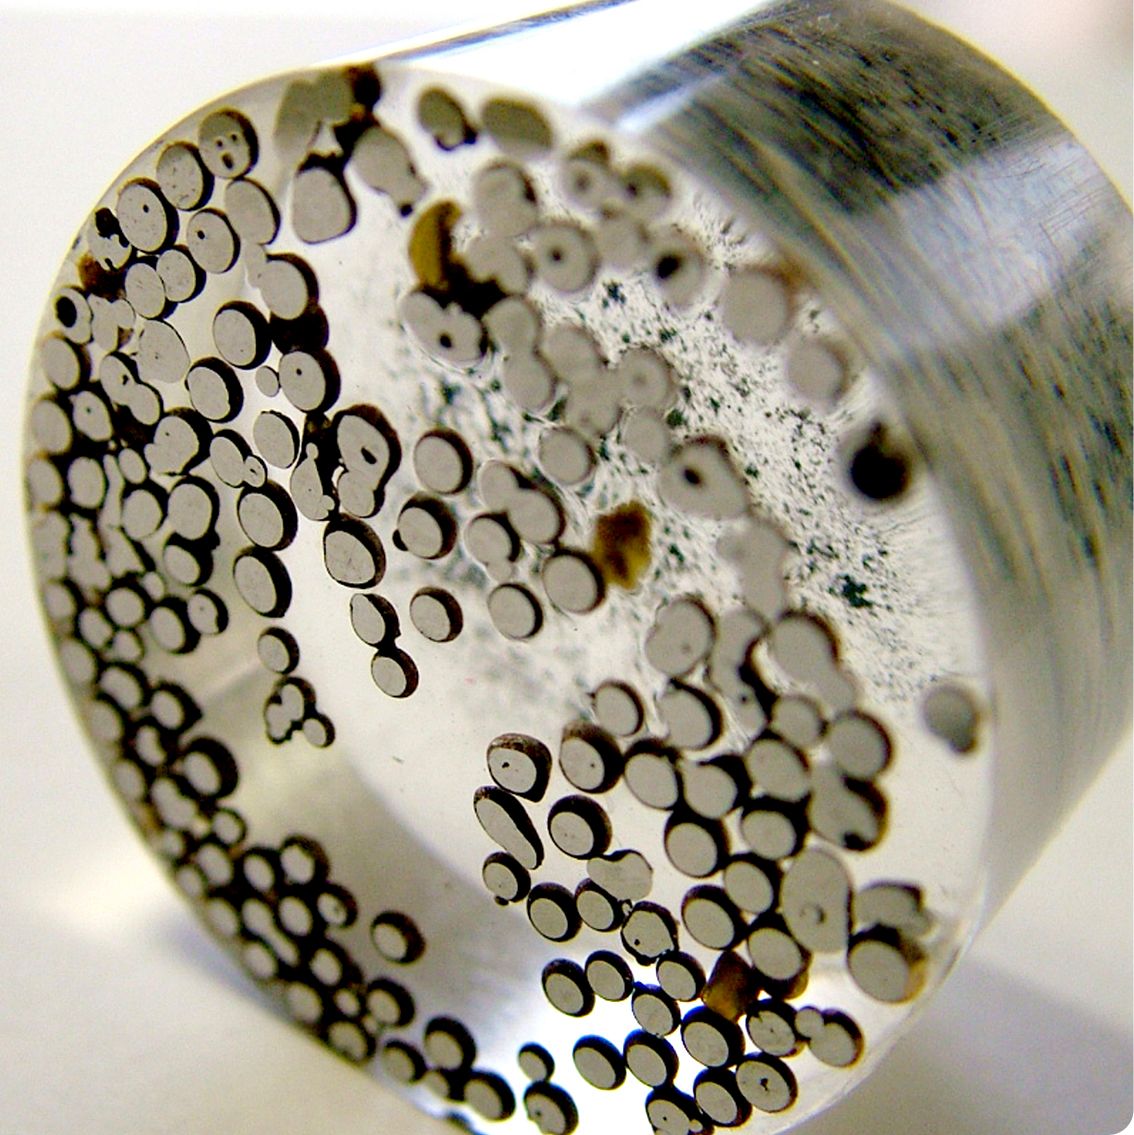
Void-Free Mounting Techniques and Defect Prevention
Producing defect-free mounts is an ongoing challenge in metallographic sample preparation. Despite correct resin selection and mixing, voids and other defects can ruin results. Fortunately, there are special techniques for eliminating these typical problems.
Vacuum impregnation for porous samples
Vacuum impregnation is critical for porous samples like sintered metals, thermal spray coatings, and corroded samples. First to note, the method entails putting the sample and freshly mixed resin in a vacuum chamber at 25-30 inHg for between 5-10 minutes. While the chamber evacuates air, bubbles are released from sample pores. When the vacuum is released, atmospheric pressure pushes resin into these evacuated pores, achieving complete impregnation.
Air bubble troubleshooting and removal methods
Air bubbles remain one of the most common mounting errors, generally brought about by improper mixing or pouring techniques. To minimize bubble formation:
- Mix resin slowly but thoroughly to avoid air inclusion
- Pour down the mold wall in one continuous stream
- Tap molds filled gently on the work surface to free trapped air
- Apply pressure curing (2-3 bar) that pushes out any remaining bubbles
As epoxy resins possess longer working times, degassing them separately before adding hardener generally yields improved results.
Edge retention in brittle specimens
Edge preservation in brittle materials needs special attention. Definitely, the use of low-shrinkage epoxy resins (less than 1%) greatly enhances edge retention. Notably, the support of fragile edges during mounting prevents fracturing—I usually encircle brittle specimens with metal filler particles to evenly distribute stresses upon curing and further preparation.
Common cold mounting defects and how to avoid them
Beyond air bubbles, several defects can compromise mount quality:
- Incomplete curing: Resulting from inaccurate mix ratios or low temperatures; ensure proper measurements and curing conditions
- Surface segregation: Caused by contamination; clean specimens well prior to mounting
- Shrinkage cracks: Caused by excess exothermic heat; employ staged curing for big mounts
- Resin pull-out during polishing: Occurs with soft resins; utilize harder formulations for abrasive samples
Finally, void-free mounting depends on attention to detail during every step of the mounting procedure, from specimen prep to final cure.
Post-Mounting: Curing, Polishing, and Inspection
After complete curing, metallographic specimens require careful handling if reliable microstructural information is to be gathered. Demolding, polishing, and final inspection procedures directly affect the quality of analysis and whether your cold mounting operation has been a success.
Demolding and surface inspection
After curing time has elapsed, remove specimens from molds by gently flexing mold sides away from the mount. Avoid using sharp tools that may inflict damage on the mold or mount. During demolding, examine the mount surface for visible defects under good lighting immediately. During this initial examination, look for:
- Uniform surface appearance without discoloration
- Complete hardness without soft spots (test with fingernail)
- Proper specimen positioning and orientation
- Absence of large air bubbles or voids near sample edges
If the mount surface is cloudy or tacky to the touch, this is a sign of incomplete curing—return it to controlled conditions for longer.
Polishing after cold mounting: grit sequence and pressure
Polishing of cold-mounted specimens requires some different approaches than for hot-mounted samples due to their different hardness characteristics. Begin with planar grinding using coarser abrasives (120-240 grit) to produce a flat reference surface. Proceed through finer grits according to material requirements:
- 320/400 grit: Use medium pressure (20-25N)
- 600/800 grit: Decrease pressure slightly (15-20N)
- 1200 grit: Use light pressure (10-15N)
- Final polishing (3-1μm): Apply light pressure (5-10N)
During the polishing sequence, epoxy mounts generally can tolerate greater pressures than acrylic ones. For best results, reduce polishing time and pressure for acrylic mounts to avoid heat generation and possible specimen pulling.
Metallographic Grinding Tips: Expert Guidance for Perfect Sample Preparation
Checking for voids, cracks, and edge loss
After preliminary polishing, carry out detailed examination under magnification (10-50x) for possible defects. Check for:
- Voids appearing as dark spots around specimen edges
- Microcracks emanating from corners of angular specimens
- Edge rounding or material pullout
- Resin separation from specimen borders
Even small voids usually signify improper impregnation or polishing too early prior to complete curing. Edge loss commonly implies too much polishing pressure or incorrect resin choice. In instances where profound defects manifest, remounting is frequently required instead of proceeding with an already compromised specimen. As long as minor problems are dealt with early within the preparation sequence, modifications to later polishing steps can frequently recover satisfactory results.
Conclusion
Optimizing the metallographic cold mounting procedure really comes down to strict attention to detail at each step. In this step-by-step guide, we’ve looked at how proper cold mounting preserves heat-sensitive materials’ true microstructure while providing essential support for subsequent analysis. We’ve also explored the primary differences between epoxy and acrylic resins—balancing factors like cure time, shrinkage, and hardness against application requirements.
The selection of appropriate resins significantly impacts final results. Epoxies excel with their superior edge retention and minimal shrinkage, though they require patience during longer curing periods. Conversely, acrylics offer faster processing when time constraints outweigh precision requirements. Therefore, understanding your specific specimen characteristics becomes essential for making informed resin choices.
Metallographic Cutting Guide: Pick the Right Machines, Wheels& Coolants
Void-free mounting techniques, such as vacuum impregnation of porous samples, are key to preventing common faults. Despite optimum resin choice, nevertheless, improper mixing or pouring can prove to be a cause of annoying air bubbles. Curing with controlled temperature also favors even hardness development without risking heat damage to sensitive specimens.
The final quality of metallographic analysis depends highly on these preparation steps. Hence, each step—from cleaning the original sample to demolding and polishing—has to be carried out cautiously. Though the cold mounting process consumes more time than hot mounting processes, this time is spent on well-preserved microstructures and accurate analysis results.
Equipped with these methods, you can prepare even the most difficult specimens for metallographic analysis with confidence. The information presented here forms a basis for reproducible, high-quality sample preparation that will stand you in good stead for a variety of materials and analysis goals. Keep in mind that patience and attention to detail every step along the way will always result in the flaw-free mounts necessary for reliable materials characterization.
FAQs
Q1. What is the main advantage of cold mounting over hot mounting in metallography? Cold mounting is best for heat-sensitive materials as it prevents thermal stress, preserving the original microstructure of specimens. It is therefore ideal for materials like polymers, low-melting point alloys, and heat-treated components.
Q2. In what ways are epoxy and acrylic resins different in cold mounting applications? Epoxy resins are harder and have less shrinkage, which makes them ideal for edge retention and porous samples. Acrylic resins cure more quickly but with more shrinkage and less hardness, which makes them ideal when speed of processing is more critical than accuracy.
Q3. What is vacuum impregnation and when do we utilize it in cold mounting? Vacuum impregnation is a procedure used for porous samples like thermal spray coatings or sintered metals. We utilize it by placing the specimen and resin under a vacuum chamber for the removal of air from pores to gain complete resin penetration and reduce defects.
Q4. How are air bubbles reduced in cold mounting? To reduce air bubbles, mix resin slowly but extensively, pour down the mold wall continuously, tap filled molds on the work surface gently, and try pressure curing. With epoxy resins, degassing prior to the addition of hardener can also produce enhanced results.
Q5. What is to be checked after demolding a cold-mounted specimen? Check the mount after demolding for a uniform appearance of the surface, complete hardness, proper positioning of the specimen, and absence of excessive air bubbles or voids around the sample edges. Check also for discoloration or a sticky feel, which can indicate incomplete curing.
Q6. Can I mount several small specimens in a single cold mount? Yes—separate them ≥2 mm apart. Employ a slow-cure epoxy to allow pieces to settle without drifting.
Q7. How do I reduce odor from acrylics? Work beneath extraction, store liquid component in the fridge (10 °C), and close containers as soon as possible after use.
Q8. Is colour pigment harmful to SEM work? Organic dyes can charge under the beam; for SEM use graphite-filled or dye-free epoxy and paint puck edges with conductive paint.


