Electrolytic Sample Preparation
KNOWLEDGE
ELECTROLYTIC SAMPLE PREPARATION
Electrolytic polishing is the best way to polish very soft materials which are prone to smearing and deformation. It can be easily applied to objects of complex shape.
Materials that work well for electropolishing or etching include soft austenitic stainless steels, aluminum and aluminum alloys, copper and copper alloys, among others.
Shorter preparing time is needed for electrolytic polishing and etching process compared to traditional mechanical preparation.
The primary requirement for electropolishing is that the specimen be conductive.
Electropolishing is also commonly applied to the preparation of thin metal samples for transmission electron microscopy because electropolishing does not cause mechanical deformation of surface layers usually observed when mechanical polishing is used.
METKON offers ELOPREP Electrolytic Polishing & Etching Unit for fully automatic electrolytic sample preparation. Electrolytic sample
preparation process consist of several steps. See step by step electrolytic sample preparation as follow:

STEP 1: Preparing Electrolyte
Each specimen may require different Gpes of electrolytes. Proper electrolyte should be selected for specimen. Please see instruction manual of ELOPREP to see common electrolytes.
Fill electrolyte container of ELOPREP with correct electrolyte and place it on polishing unit. If you have different specimens which required different electrolytes, you can use additional electrolyte containers. Thus, you do not have to change electrolyte for different Gpes of specimen, you only need to change electrolyte container.
STEP 2: Choosing Masks
Acid resistant masks are used for determining polishing area of specimen. There are specific aperture on the masks. Electrolyte will contact the specimen surface from this aperture thus only this area will be polished. Masks are available with 0,5-1-2 and 5 cm2 aperture size. Mask should be placed on cathode and specimen should be placed on the mask.
STEP 3: Adjusting Flowrate
Flowrate of electrolyte should be adjusted before operation. In other words, electrolyte should be reached upper level of the mask without any turbulance. Otherwise, polishing operation cannot be done properly.
To adjust flowrate, press Pump buWon without placing sample. If the flow rate is not enough, increase the set value until the flow is sufficient.
STEP 4: Preparing Specimen
Surface of specimen should not be rough for electrolyic preparation. Specimen should be grinded with 600 grit SiC grinding paper before electrolytic preparation.


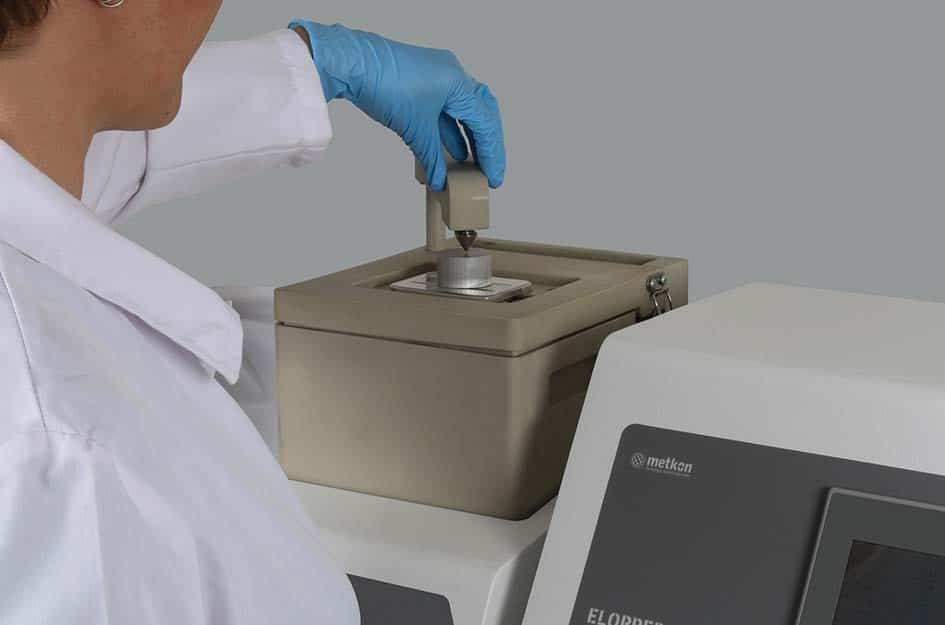
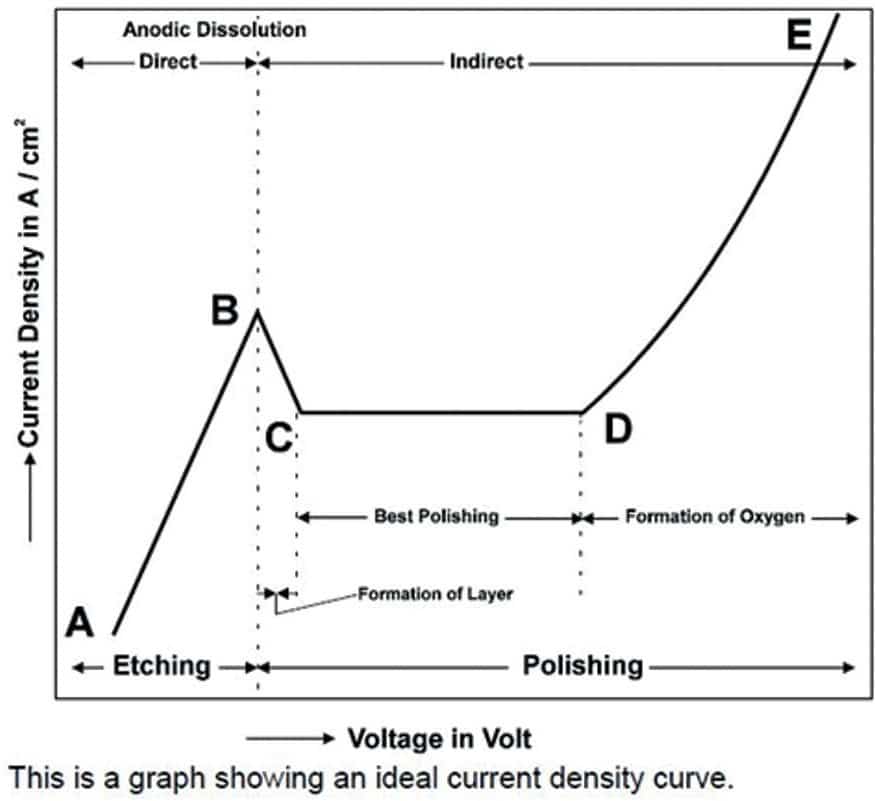
STEP 5: Determining Correct Voltage
Voltage is one of the most important parameter for electrolytic polishing. ELOPREP has scanning function for easy and exact determination of the parameters. With the scanning function of ELOPREP, correct voltage of polishing can be defined automatically. If you do not have the knowledge for the polishing voltage to be set for your sample, you can use the scanning function to determine exact voltage. You do not have to make time consuming trials and error testing for the correct voltage.
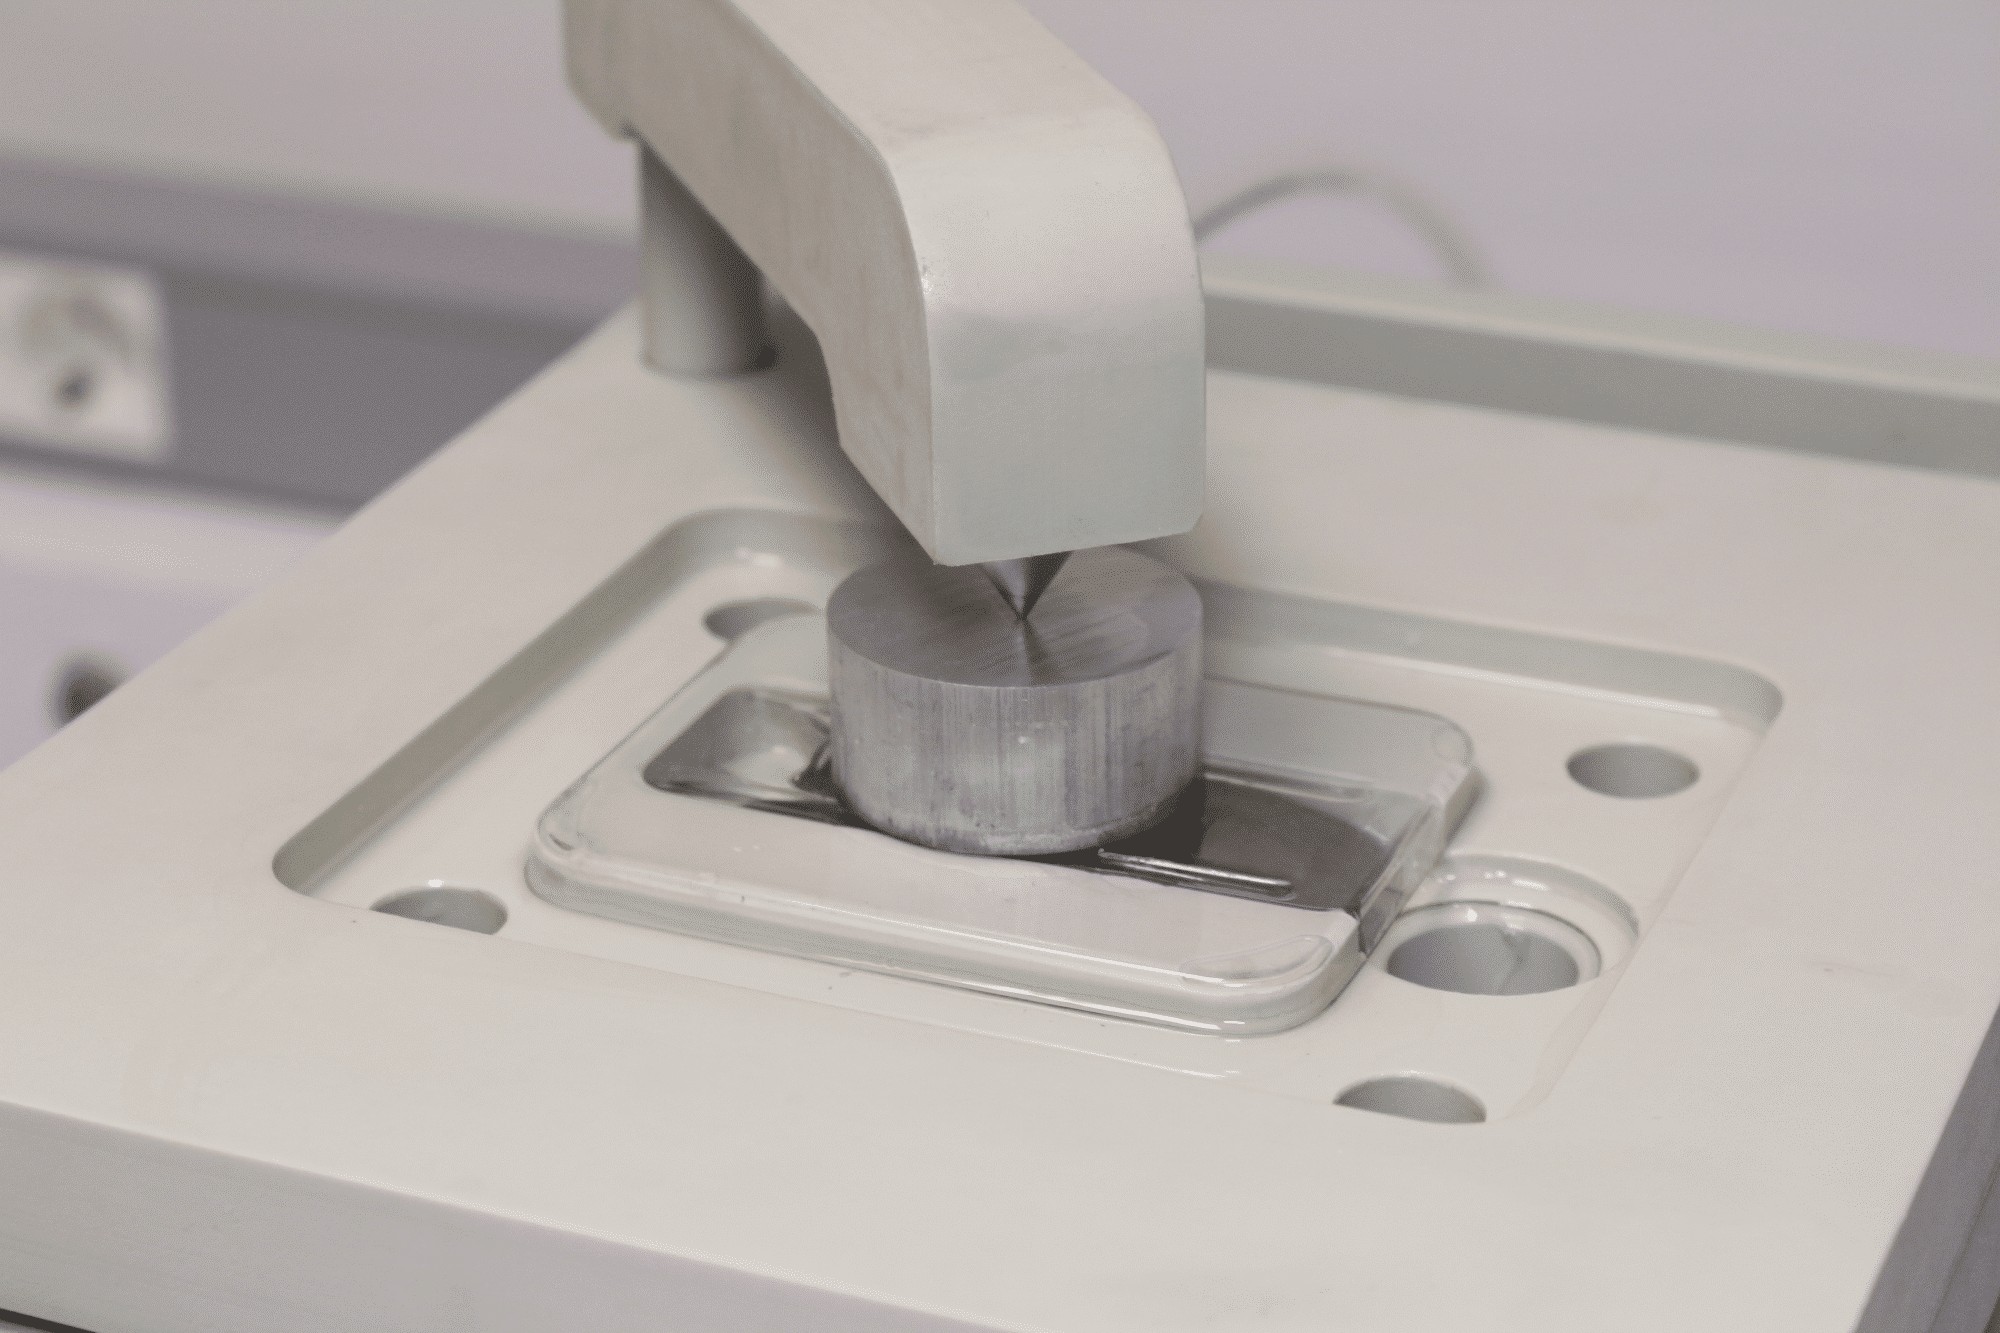
*Place specimen on the mask. Be sure that the aperture is covered and closed completely.
*Place the anode arm on the top of the sample to ensure good contact.
*Enter Scan menu, set scanning voltage and flowrate parameters and
press Start.
*After a while, ideal polishing voltage for your specimen will be seen
on the screen.
STEP 6: Electrolytic Polishing & Etching
ELOPREP has 4 different operation modes; only polishing, only etching, automatic etching after polishing and external etching.
*Place specimen on the mask. Be sure that the aperture is covered and closed completely.
*Place the anode arm on the top of the sample to ensure good contact.
*Enter Polishing&Etching menu. Set parameters: Voltage, flowrate, mask Gpe and time.
For only polishing:
Set only polishing time and polishing voltage. Do not set etching time and etching voltage, these should be zero “0”. Press start and operation will be completed automatically. The specimen must be washed after polishing operation is completed.
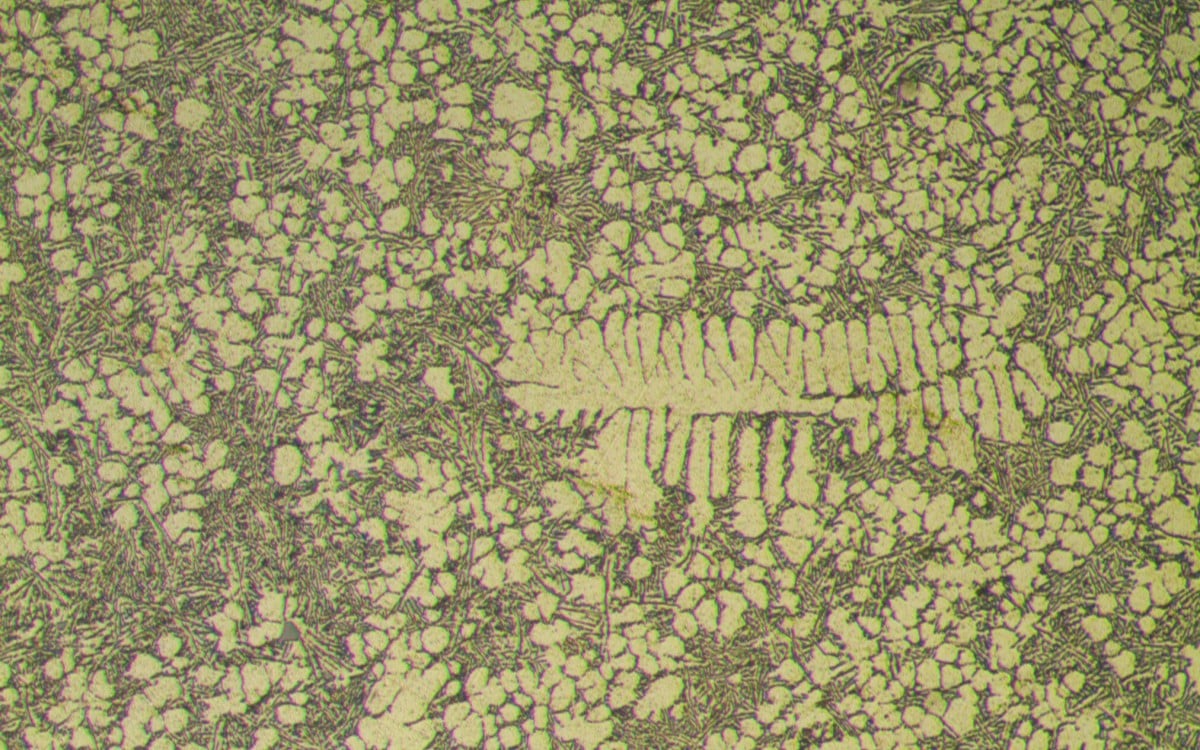
Polished surface and microstructure can be seen as below:
For only etching:
Set only polishing time and polishing voltage. Do not set etching time and etching voltage, these should be zero “0”. Press start and operation will be completed automatically. The specimen must be washed and etching operation is completed. Microstructure of etched surface can be seen as below:

For automatic etching and polishing:
Set polishing voltage, polishing time, etching voltage and etching time. Do not set etching time and etching voltage. Press start. Etching will be done automatically after polishing operation is completed. The specimen must be washed after etching operation is completed.
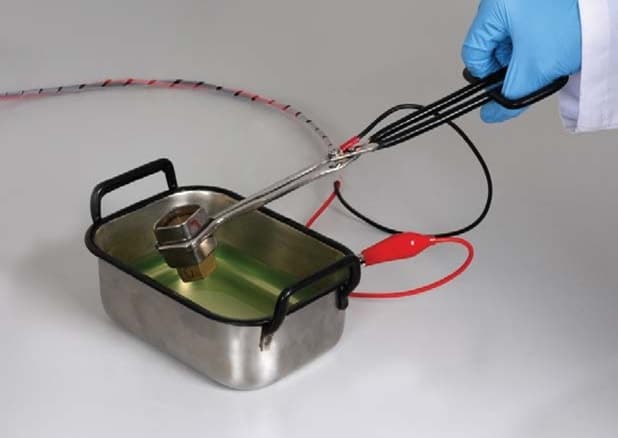
For external etching:
If polishing and etching electrolytes different than each other, in this
case external etching unit can be used.
*Fill external etching unit with electrolyte.
*Connect cables of external etching unit to control unit.
*Enter External Etching menu. Set etching voltage and time.
*Hold the sample with scissors.
*Plunge the sample into the external etching unit. As soon as the sample contacts with the electrolyte the process will start automatically.
*As soon as the set etching time is reached an audible signal notifies the operator that the process is completed. Wash your specimen after etching is completed.
GET YOUR GUIDE FOR ELECTROLYTIC SAMPLE PREPARATION
Discover everything you need to know about the Electrolytic Sample Preparation with our comprehensive brochure.


Get a hands-on training tailored to enhance your team’s capabilities. Explore the full potential of our expertise with dedicated, customer-focused solutions!

WHAT OUR CUSTOMERS SAY ABOUT METKON

