What is Metallography? Definition, Techniques & Industrial Applications
What is Metallography? Definition, Techniques & Industrial Applications
Metallography is a science and an art that examines the microstructure of metal and metal alloys. The history of metallography dates back to approximately 7000 BC when humans discovered that there existed a method of shaping metal through the use of fire. The early specialized discipline has evolved into an important discipline that reveals and examines the internal structures of materials.
A metallographic sample preparation consists of a number of techniques. These techniques range from cutting and mounting to grinding, polishing, and etching. Proper sample preparation steps result in correct microstructural characterization. This ranges from documentation and sectioning to microscopic examination and hardness testing. Metallography bridges material composition, processing, and performance. An experienced technician can determine alloys and even forecast material properties using metallographic methods only.
This article encompasses all that is in metallography, from basic definitions through sophisticated analytical techniques. It entails optical microscopy that enlarges structures 50-000 times their size and scanning electron microscopy with magnifications of up to 500,000 times. The document further discusses the way metallographic analysis enhances the reliability and lifespan of metals in industries of any size, particularly if you have quality control measures for die casting and casting parts.
Understanding Metallography: Definition and Scope
Metallography is at the very center of materials science. It provides the engineer and scientist with an effective means of looking into the unseen world of metals and determining how they perform in actual service.
What is metallography in materials science?
Metallography examines the microstructural and structural characteristics of metallic materials by quantitative and qualitative analysis. This branch of specialization investigates the chemical and atomic structure of metals, as well as the distribution of grains, constituents, inclusions, and phases in space.
Experts are able to view intricate crystalline structures that the naked eye cannot detect using metallographic analysis. This intensive technique allows engineers to:
- Find defects faster and learn why they happen
- Study deformation patterns and particle boundaries
- Examine intermetallic phases and porosity levels
- Study segregation, contamination, and crystal structures
Metal components are a critical component of modern industry. Whether in the form of car components or aerospace components, quality metallographic analysis is central to product development and quality control.

Difference between metallography and materialography
These words are usually used interchangeably by people, although there are fundamental differences between them. Metallography is concerned with metals and metallic alloys, whereas materialography deals with a broader category of materials.
Metallography is a specialized branch of materialography. The discipline has expanded from its historical roots as new materials such as ceramics, polymers, and composites have gained prominence in industry. Then, more encompassing terms came into use:
| Field | Focus | Example Materials |
| Metallography | Metals and alloys | Steel, aluminum, titanium |
| Ceramography | Ceramic materials | Silicon carbide, alumina |
| Plastography | Polymeric materials | Thermoplastics, thermosets |
| Materialography | All material types | Metals, ceramics, polymers, composites |
Every specialty requires various methods for various types of materials, nonetheless, the basic concept remains the same—creating samples that reveal internal structures that we can’t usually observe.

Why microstructure matters in engineering applications
Material properties rely to a great extent on microstructure. The physical structure of a material—its crystal structure, grain size, and distribution of impurities—directly influences important properties that govern how well it performs in actual use.
Actually, microstructure has a profound influence on mechanical properties such as tensile strength, elongation, and the ability of materials to conduct heat or electricity. Other important properties such as strength, toughness, ductility, hardness, corrosion resistance, and wear resistance also rely on microstructural factors.
It is an excellent source of gaining knowledge for mechanical engineers. They previously considered materials in terms of mechanical properties and mechanical behaviors primarily, but this perspective is rapidly changing. Contemporary computational micromechanics now aids the engineers in determining what aspects of material processing influence microstructures that enhance performance.
Microstructural analysis performs the following important roles:
- Quality control: Making sure manufacturing processes meet specifications
- Defect reduction: Identifying and repairing structural defects
- Process optimization: Improving production methods
- Property prediction: Interpreting how mechanical properties are related to microstructure
The microstructure-property relationship has taken center stage in advanced manufacturing. To give just one instance, additive manufacturing of metals requires profound microstructural understanding, and this has prompted education programs to re-examine its significance in undergraduate education.
Cutting-edge microscopy and imaging have revolutionized the way we visualize these small structures. With optical microscopy that can magnify up to 1000× and sophisticated electron microscopy that can visualize individual atoms, these instruments allow us to gain knowledge about material composition and behavior like never before.
Metallography wound up bridging the gap between theory and practice. Metallography assists in enabling engineers to predict performance, determine the reasons for failure, and develop materials with precise properties for particular industrial applications.
Historical Evolution of Metallography Techniques
Metallography’s emergence is one of the most fascinating tales of scientific advancement. Metallography has pushed the boundaries of what is visible in metal structures, evolving from simple observation to sophisticated digital analysis.
Henry Clifton Sorby and the first micrograph (1864)
The British scientist Henry Clifton Sorby (1826-1908) marked the starting point of modern metallography. His motivation for studying metal structures was born out of genuine business interests. Sorby had inherited a shop in Sheffield, England that produced cutting tools but was having financial difficulties. Nobody really knew what made tools hard and tough. Sorby’s background in geology created a critical connection – metals could also tell their secrets under the microscope, similar to rocks.
Sorby was the first to polish metal samples for examination under microscopes in 1863. He observed that broken cutting tools exhibited crystal patterns like rock samples. He penned in his diary that year: “Discover the Widmannstättischm structure in iron”. His major breakthrough was when he articulated six distinct metallographic structures of steel under a microscope at the Newcastle British Society conference. It confirmed that steel possessed multiple crystalline structures following acid leaching.
A turning point came in September 1864. Sorby gave real micrographs of steel at the British Society. The presentation laid the foundation of metallography as a science. His comprehensive work recognized “different mixtures of iron, two or three well-characterized compounds of iron and carbon, of graphite and of slag”. These results made us know more about metal microstructures.
Prior to this work, proposing microscope analysis of fractured railway rails would have been considered insane. You “would have been looked upon as a fit man to send to an asylum”. Now it is routine practice.
The Ultimate Guide to Grinding and Polishing: Techniques, Equipment, Materials, and Best Practices
Development of optical and electron microscopy
Sorby’s pioneering work did not take hold immediately. He moved on to other studies and returned to steel only in 1882, when he published his comprehensive results in 1885. By this time, scientists such as Chernoff (1868), Martens (1878), and Osmond (1885) had initiated their own metal structure investigations in ignorance of Sorby’s previous work.
Optical microscopy was the principal method to examine materials, particularly metal alloys. Researchers continue to utilize this simple method to investigate numerous facets of metallurgy such as solidification, phase transformations, grain structures, and fracture analysis. These microscopes have the capability to magnify up to 1000 times – sufficient for most practical applications.
Electron microscopy revolutionized everything by enabling much greater magnifications. Optical techniques reveal the bigger picture, but electron microscopes magnify specimens as much as 500,000 times. This is of great assistance for metallurgical failure analysis and instruction.
Modern advancements in high-resolution imaging
Computer technology and automated machines accelerated the development of metallography tremendously. The pioneering companies, such as DISA and Struers, developed the initial mechanical metallography equipment, such as the DISA Electropol and Knuth-Rotor grinding machine.
Metallographers utilize completely automatic materialographic machines now. Xmatic is the world’s first complete grinding and polishing solution that is fully automatic. These developments have transformed a time-consuming manual process into a precise, reproducible science.
Metallography has developed through practical engineering requirements, experimental science, and innovative thinking. Cyril Smith remarked in his seminal treatise on the history of metallography that both theoretical scientists and practical craftsmen influenced the discipline.
Metallographers today can now decide whether to examine samples with the naked eye or through the use of microscopes, as required and depending on materials. This versatility has extended the application of metallography to numerous industries without losing its fundamental function: revealing concealed structures that dictate the behavior of metals.
Step-by-Step Metallographic Sample Preparation
Correct microstructural analysis requires correct metallographic sample preparation as its basis. It is a process that converts raw material to a microscope-examined specimen ready in a series of steps.
Sectioning and cutting: Avoiding thermal damage
The greatest difficulty in metallographic preparation is obtaining a representative sample without altering its microstructure. You must slice possibly cumbersome components into manageable cross-sections that reveal the region you intend to analyze. Heat becomes your primary concern in the process since excessive amounts of it can alter the material’s microstructure in unpredictable manners.
Wet abrasive cutting is the fastest method for reducing this risk. This process produces very little deformation—typically less than 200 µm from the cut surface. You require good coolant circulation for three important reasons:
- It prevents heat from altering the microstructure
- It removes abraded particles
- It contains corrosion protection agents which avert surface oxidation
Metals such as magnesium and its alloys require special attention. Magnesium dust is ignitable, and thus you should utilize coolant. The issue is that pure magnesium reacts with water. Because of this, some professionals recommend using a 1:3 ratio of glycerol to ethanol as a substitute cutting fluid.
Cold mounting vs hot mounting: When to use each
The sectioning is followed by mounting, which places the specimen inside a plastic shell. This readies it for subsequent processing and guards its edges and surface details. You will have to decide between cold and hot mounting depending on various factors.
Hot mounting (compression mounting) employs thermosetting resin or thermoplastic under pressure and heat. The advantages of this method are obvious:
- Makes harder mounts that keep edges better
- Creates uniform-sized mounts
- Makes manual polishing easier
- Works well with automated machinery
The disadvantage is that hot mounting subjects specimens to heat between 50-200°C at 100-300 bar pressure. These conditions are not suitable for heat-sensitive or pressure-sensitive materials.
Cold mounting requires no pressure or external heat, making it ideal for sensitive specimens. Acrylic resins are a favorite in cold mounting systems since they’re inexpensive and cure fast but may shrink. Epoxy systems are more expensive but adhere better and hardly shrink—ideal for samples that have cracks or pores.
Mounted samples tend to retain edges better than unmounted samples. Hot compression mounts are better at edge protection than castable systems. You can try electrolytic or electroless nickel plating of the surface for excellent edge preservation.
Grinding and polishing: Achieving a mirror finish
Samples undergo grinding and polishing carefully after mounting. Begin grinding with the coarsest grit size that will flatten the surface and eliminate sectioning effects with speed. Abrasive wheel-cut surfaces generally require 180-240 grit, whereas rougher cuts may require 120-80 grit.
Every successive grinding operation should employ slightly finer abrasives than the previous one. You can utilize silicon carbide papers of grit numbers 240, 320, 400, and 600 sequentially. Clean very well between steps—even a single large abrasive grain will destroy your painstakingly prepared specimen.
Polishing transforms a ground surface to an ideal, deformation-free mirror finish that you require for proper microstructural examination. This occurs in a number of stages:
- Begin with 6 or 3µm diamond abrasives on low-nap cloths
- Proceed to 1 µm diamond on medium-nap cloth
- Finish with submicron abrasives for ultimate luster
Maintain steady and even pressure during the process. Do not apply excessive lubricant in order not to overheat. MasterPolish—a nearly water-free final abrasive—is excellent for difficult materials such as magnesium alloys. At the finish, clean your specimens with ethanol rather than water to avert surface reactions.
Etching in Metallography: Techniques and Reagents
Etching is the final critical phase of metallographic sample preparation. It renders the microstructure of a polished specimen visible by using selective chemical or physical processes. Without this important process, you will not observe much regarding a specimen’s internal structure, despite perfect polishing.
Chemical etching: Nital, Kroll’s, and Keller’s reagents
Chemical etching selectively attacks certain microstructural components by controlled corrosion. The procedure reveals grain boundaries, phases, and other structural details that you cannot observe in the polished condition. Chemical etching success is a function of selecting the appropriate reagent for the material system involved.
Nital, which is a combination of nitric acid and ethanol (usually 5%), is excellent at revealing:
- Ferrite grain boundaries and constituents in steels
- Welding structures in ferrous alloys
- Segregation zones in cast materials
Kroll’s reagent (2 ml HF, 4 ml HNO₃, and 94 ml H₂O) and Keller’s reagent ( 1 ml HF, 2.5 ml HNO₃, .5 ml HCl, and 95 ml H₂O) give the best results for titanium and aluminum alloys. The two reagents reveal phase structures clearly when utilized at room temperature for approximately 20 seconds.
These reagents react differently depending on alloy composition. To cite only one example, 3D-printed Ti-6Al-4V in as-built condition is resistant to both Kroll’s and Keller’s reagents. Prolonged etching times up to 90 seconds only produce excessive pitting without improved visualization.
Other common etchants include:
| Etchant | Composition | Application | Conditions |
| Murakami | K₃Fe(CN)₈ + NaOH/KOH + H₂O | Stainless steels, tungsten alloys | Room temp. or hot, 60 seconds |
| Kalling #1 | Proprietary | Martensitic stainless steels | Room temperature |
| Kalling #2 | Proprietary | Stainless steels (rapid ferrite etching) | Room temperature |
Electrolytic etching: Setup and safety
Electrolytic etching employs external voltage that imposes certain redox reactions at the surface of the specimen. It provides improved control and reproducibility by variable voltage and current compared to chemical techniques involving immersion or swabbing.
The procedure requires:
- A conductive specimen (practically restricted to metals)
- Suitable electrolyte (frequently acids or bases)
- Power supply with voltage/current regulation
- Correct cell geometry for even etching
The majority of electrolytic configurations are two-electrode types with the sample as anode and an auxiliary cathode. Nevertheless, three-electrode arrangements (anode, cathode, and reference) allow you to control current and voltage separately.
Electrolytic techniques are faster in removing material compared to chemical methods. This makes them ideal for both etching and polishing. You can achieve deformation-free surfaces that reveal true microstructure.
Thermal and plasma etching for ceramics
The high chemical resistance of ceramic materials requires alternative etching methods. Thermal etching involves heating polished samples below their sintering temperature and is the fastest method of revealing ceramic microstructures.
Thermal etching of Alumina (Al₂O₃) typically occurs 50-200°C below sintering temperature for 15-30 minutes. The procedure develops surface relief by grain boundary grooving that gives contrast for microscopic observation. Current findings indicate that lower temperatures in the range of 900°C were able to maintain for extended durations ( hour) disclose microstructure without altering grain size or density.
Plasma etching became another strong technique in the late 1960s from microelectronics fabrication. In this technique, radio frequency-excited electric discharge is used to produce chemically reactive fragments from special gasses at low pressure (0.001 to 2 torr).
CF₄ with 4% O₂ is particularly effective for silicon-based ceramics. The process preferentially attacks Si₃N₄ grains in silicon carbide whisker (SiCw)/silicon nitride (Si₃N₄) composites, leaving SiCw and glass phases in relief. The kind of thing that I like about this process is the way it deposits a thin carbon layer on Si₃N₄, allowing components to be easily distinguished using backscattered electron imaging.
Microscopy Methods for Metallographic Analysis
Etching and sample preparation bring out concealed microstructural details in metallographic samples during microscopic analysis. Various microscopy methods are optimal for particular analysis problems.
Bright field vs dark field microscopy
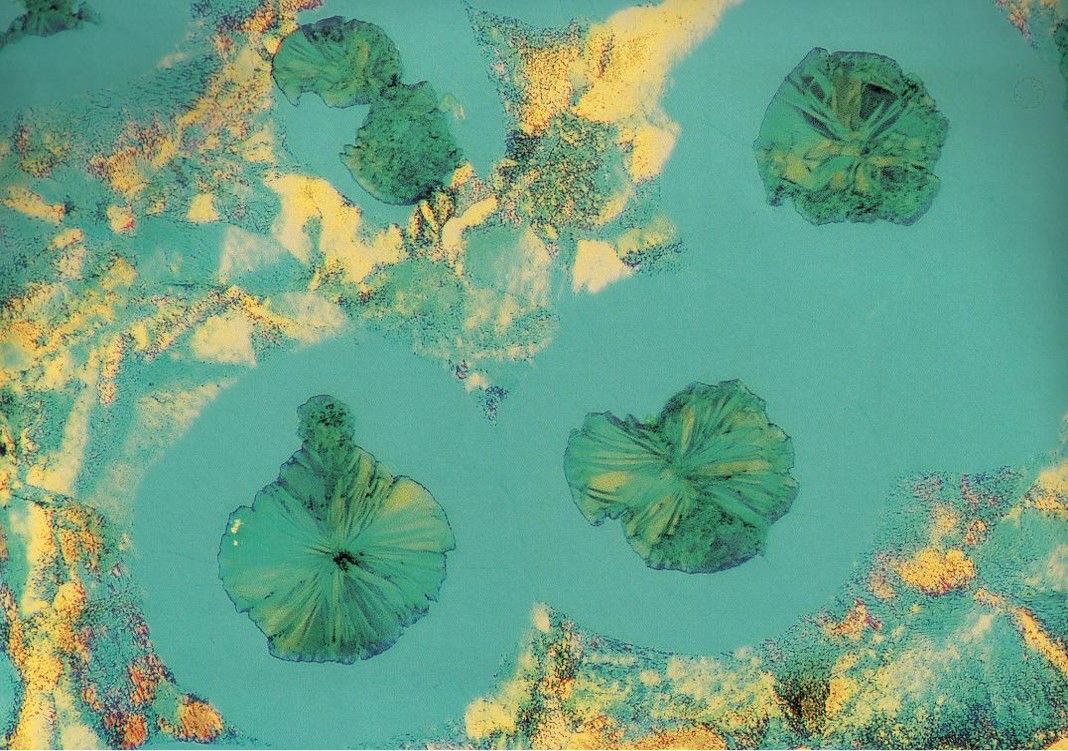
Bright field illumination is still the most prevalent method in metallographic examination. The light travels from the source via the objective lens, reflects off the surface of the specimen, and comes back through the objective to reach the eyepiece or camera. Flat surfaces appear bright in such images, whereas features like cracks, pores, and grain boundaries are darker relative to the background.
Dark field microscopy produces very different images. Light travels through an outer hollow ring of the objective at high angles of incidence. The objective only collects light scattered by surface features, making flat surfaces appear dark and non-flat features glare brightly. This method is particularly good at revealing:
- Surface defects and discontinuities
- Fine scratches and polishing artifacts
- Grain boundaries in some materials
Dark field microscopy simplifies the visibility of small craters and depth in metals by deflecting light around object edges. This eliminates glare without losing any of the detail.
Differential interference contrast (DIC)
DIC, or Nomarski contrast, enhances subtle differences in height on specimen surfaces. A Wollaston prism with polarizer and analyzer filters that are orthogonal to one another is used in the technique.
The prism divides polarized light into two beams that pass through the specimen and recombine afterwards. This interference renders height differences visible as color and texture changes. DIC produces stunning pseudo-3D images that reveal:
- Surface relief invisible with bright field illumination
- Structural details without staining requirements
- Delicate details in etched and polished specimens
Francis Smith invented DIC in 1947, and Georges Nomarski improved it in 1952. The method can reveal phase differences as minute as 1/200 of a wavelength—or 1/1000 with the use of a camera. Such sensitivity allows metallographers to observe details totally invisible under bright field illumination.
Scanning electron microscopy (SEM) and EDS
SEM provides abilities far exceeding optical methods when increased magnification and resolution are required. It operates by directing a focused beam of high-energy electrons at the surface of the specimen. The interactions of electrons with the sample produce signals that exhibit valuable details on texture, microstructure, and manufacturing processes [90, 9].
SEM gives metallographic analysis several advantages:
- Ultra-high resolution metal microstructure images
- Exceptional depth of field for examining fracture surfaces
- Magnifications from 5× to 300,000×
- Improved imaging of defects such as cracks, voids, and wear patterns
SEM is even more potent when coupled with Energy Dispersive X-ray Spectroscopy (EDS or EDX). EDS quantifies the energy and intensity of X-rays that are emitted during specimen-electron interactions. Analysts can utilize this to:
- Determine elemental components of inclusions and foreign materials
- Produce color-coded elemental maps of element distribution
- Conduct quantitative analysis of alloy compositions
SEM-EDS allows the identification of the reasons for failure of metals and other conductive materials by integrating visual observation and chemical analysis. This combination provides a root cause explanation in failure analysis—a very important use of metallography.
What is the Vickers Hardness Test? | Method, Applications & Advantages
Metallography in United States
Metkon is a trusted materials science and quality control process partner with cutting-edge solutions in the metallography field in the United States. Our premium quality metallographic sample preparation equipment guarantees high precision in cutting, molding, grinding, polishing, and imaging processes, making them suitable for applications from research labs to industrial manufacturing facilities. Through our network of distributors and technical support staff within the US, customers enjoy not just easier access to higher quality equipment but also quick service, application support, and training services. Through our cutting-edge technology, ASTM and ISO-compliant solutions, and customer-centric mindset, we are still addressing the metallography requirements of research institutions, research centers, and manufacturing industries in the US.
FAQs about Metallography
Q1. What is metallography and why is it important? Metallography is the examination of the microstructure of metals and alloys through the use of microscopy. It’s important since it shows important information regarding a material’s properties, history of processing, and probable performance in different applications.
Q2. What are the principal steps of metallographic sample preparation? The principal steps of metallographic sample preparation are sectioning, mounting, grinding, polishing, and etching. Each step is absolutely necessary if the true microstructure of the material is to be revealed without introducing artifacts.
Q3. What is the function of chemical etching in metallography? Chemical etching involves the selective attack of certain microstructural components by controlled corrosion to reveal grain boundaries, phases, and other structural features. Various materials are etched using different etchants, e.g., Nital for steels or Kroll’s reagent for titanium alloys.
Q4. What are the benefits of applying scanning electron microscopy (SEM) to metallography? SEM provides ultra-high resolution imaging, outstanding depth of field, and magnifications as high as 300,000x. When coupled with Energy Dispersive X-ray Spectroscopy (EDS), it is also capable of providing elemental analysis and thus is potent for failure analysis and material characterization.
Q5. What are the industrial applications of metallography? Metallography has extensive applications in the automotive, aerospace, and electronics industries in quality control, process verification, and failure analysis. It assists in investigating cast iron parts, confirming heat treatments in aerospace alloys, and failure analysis of microelectronics and coatings.


